
Cuphead – The Delicious Last Course – Glumstone The Giant Boss Guide
Need help beating Glumstone in Cuphead - The Delicious Last Course?
Share this article...
WePC is reader-supported. When you buy through links on our site, we may earn an affiliate commission. Prices subject to change. Learn more
Need help beating one of the first bosses in Cuphead – The Delicious Last Course? Well, you’ve come to the right place, and while you might be struggling to beat Glumstone The Giant and his – highly irritating – gnomes, as with all Cuphead bosses, you can do it! However, you might need a little hand.
Most Cuphead bosses end up being a memory game coupled with hoping you have the hand-eye coordination for the quick movements and reflexes required. Glumstone is a frustrating boss with three stages. Each stage features a different series of attacks and obstacles to avoid, but we’ll walk you through the patterns to look out for and what equipment works best.

Best Equipment
As with most Cuphead fights, you’ll need to personalize your equipment and abilities. Some work far better than others, and Glumstone The Giant and Gnome Way Out is no different. But also now you have the option between Cuphead/Mugman and Chalice. Chalice is a great character to play. With her additional abilities and skills, she can really help turn the tide in your favor. Especially with her parry dash which instantly makes parrying so much easier and builds up your supercharge.
It took us four hours to beat Glumstone, so don’t worry if you just don’t seem to be getting it. Don’t be afraid to take a break, take a step back and let your brain process the information before going back in. Once you’re ready, here’s what you need to know.
In terms of Equipment and Abilities, here’s what works best:

- Shot A: Spread
- Shot B: Roundabout
- Super: Your preference
- Charm: Heart Ring

- Shot A: Converge
- Shot B: Twist-Up
- Super: Your preference
- Charm: Astral Cookie
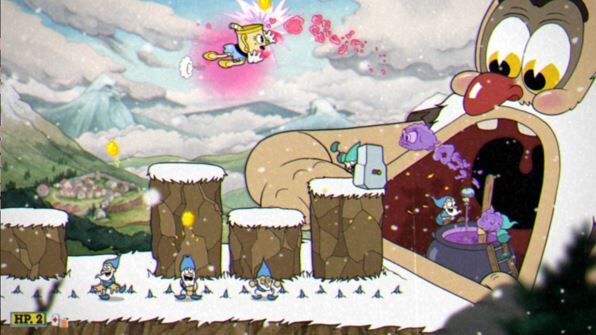
Glumstone The Giant Stage One
Stage one starts with a small section of space to move from, mainly on the four pillars. During this time, use either Converge or Spread and try to focus on Glumstone’s nose to cause the most damage. During this stage, there are a few things to look out for:
- Don’t drop onto the ground level unless you have to. The gnomes burst out of the ground and damage you if you stay there for a second too long.
- Don’t get too close to Glumstone, you’ll take damage if you even scrape his hit box.
- Gnomes that have emerged throw golden nuggets up into the air randomly. Their trajectory is pretty slow.
- You can kill the emerged gnomes, and the hammering ones as soon as they show up. Try and focus on getting rid of them as soon as they appear. It’ll make it easier for you.

During this stage, Glumstone also has a number of attacks he’ll use. Remembering and anticipating them is vital to defeating this boss and knowing just what to do. Here are all of his attacks and what to do when you see them coming:
- Open-Mouth Smoke Blows: Glumstone opens his massive mouth, revealing a pair of gnomes and a cauldron inside. The cauldron spits out hazardous smoke attacks that go in a straight line from the right of the screen to the left. One or two of these smoke balls can be parried. Your best bet is to focus on dodging them, all the while being careful of any stray gold nuggets or hammering gnomes. If you’re playing as Chalice, these smoke attacks are easy parries.
- Goose Crossing: Glumstone blows his nose-whistle and a flurry of geese fly across the screen. At this point just hop on one of the low stone pillars and crouch, you can avoid all the geese by ducking out of their way. Don’t forget, you can still fire on Glumstone while crouching.
- Bear: Glumstone pulls a bear from the mountains below and places it to the center of the pillars. As long as the first two pillars are still available, jump on them and keep firing at Glumstone. Pay no mind to the bear. This is an excellent move to lookout for as it’s free damage on Glumstone.
Glumstone The Giant Stage Two
Stage two opens with Glumstone using hand-puppets of King Dice and the Devil. These throw a ball between each other to a crowd of cheering gnomes. This is more of an obstacle course than the previous stage. You can fire on either of the puppets to deal damage, hence why Roundabout and Twist-Up are the ideal shooting styles for this mode. But here’s what you need to be wary of:
- Gnomes: The gnomes continue to appear beneath the mountain, you can usually shoot them before they fully pop out. Roundabout is especially good for this. Some of the gnomes can be parried.
- The Ball: The two puppets pass the ball to each other. Thankfully each pass is slow so you can anticipate the trajectory based on the height of each puppet. Keep track of the Gnomes and you should manage.

This stage can be frustrating because there is a lot going on at once. As mentioned above, it’s mainly an obstacle course while you deal damage to the puppets. But once you’ve beaten them, that’s when Glumstone instead decides it’s eatin’ time as he throws you down the hatch.
Glumstone The Giant Stage Three
Stage three feels a lot more claustrophobic as you’re limited to five small platforms, all while trying to deal damage to Glumstone’s stomach, specifically the ulcer part, which moves back and forth on the roof. For this stage, you want to use either Spread, Roundabout or Twist-up. This stage is a bit tricky, but once you know what you’re looking for it’s a lot easier to anticipate his moves. But before anything, here’s what to look out for:
- Incoming Darts: On either side of the screen, darts fly in a straight line to the opposing side. Some of these darts are parryable but if you miss them, they can take you by surprise and cost you a life.
- Meat and Bones: The meat and bones do damage if they hit you.
- Stomach Acid: If you fall off one of the platforms, or into the acid, you take damage. The acid also shoots you upwards to recover from the fall. Just make sure you don’t wind up being shot into incoming projectiles.

In this stage of Gnome Way Out, you’ll realize there’s a specific gimmick that once you recognize, you’ll find the whole ordeal so much easier:
- Feeding the Skulls: The ulcer spits out either bones or meat to the skulls beneath. You need to jump onto a nearby one that’s not being fed. If the skull is fed meat, it disappears under the stomach acid as it chews it up. But if it’s given a bone, it opens its mouth and rings a bell. You need to parry its tongue as soon as possible, so you can close the skull’s mouth and use it as a platform. One of the main things is to make sure you don’t get stranded, so try and keep central if you can. It’s possible all but one head is beneath the acid, making jumping from one side to the other all the harder.
That’s it for stage three! You need to spot the meat and bones, all the while avoiding the darts. Once you start recognizing the arc for the meat and bones and which head they’re going to, you’ll be able to move between platforms while firing into the stomach. This particular stage is so much easier with Chalice because of the double jump and the parry dash into the open mouth tongue.
Hopefully, at this point, you’ll have beaten Glumstone and Gnome Way Out. But if not, take a break. Sleep on it if you need to and you’ll be a Cuphead champ in no time! We’ve covered all the other Cuphead – The Delicious Last Course bosses and guides, so be sure to check these out if you need more help.


