
Elden Ring Giant-Conquering Hero’s Grave guide
The Giant-Conquering Hero's Grave is a tough dungeon in the late game of Elden Ring, so we've written a guide to help you get through it.
Share this article...
WePC is reader-supported. When you buy through links on our site, we may earn an affiliate commission. Prices subject to change. Learn more
If you’ve been playing Elden Ring long enough to have reached this area of the game, then you’ve probably had to claw your way through various dungeons to do it. You might think that you’re tough enough to take on anything at this point, but you’d be wrong. Mountaintops of the Giants is an incredibly dangerous area, and the dungeons are similarly hazardous, even to high-level and high-skill players. In particular, the Giant-Conquering Hero’s Grave brings all the fun of previous Hero’s Grave to this late stage, and you can tell it’s nearing end-game content. That’s why we put together this guide to make it easier for you.
How to find The Giant-Conquering Hero’s Grave

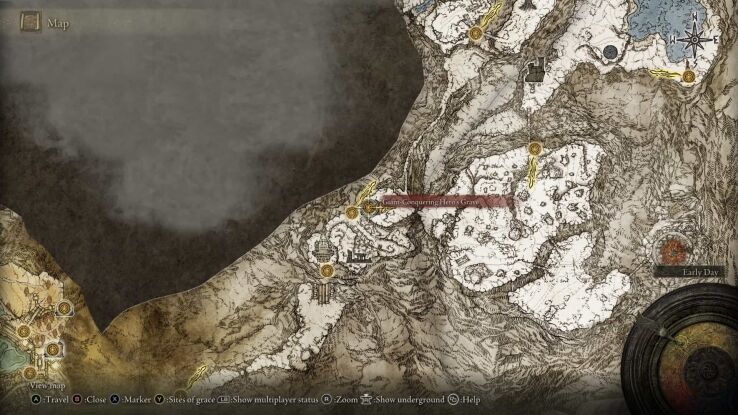
Presumably, you’ll already be in the Mountaintops of the Giants by the time you get to this stage. We need to get ourselves to the Giants’ Gravepost point of grace. From the Zamor Ruins point of grace, follow the main path around the mountain and across the narrow bridge, avoiding the shots from the giant archer. From here, activate the Ancient Snow Valley point of grace and keep heading north and then east when you hit the wall of the canyon. Follow the path up a slope to a frozen lake, then hug the west wall of the cliff ahead until you emerge above the lake. From the top of the slope, move south over a frozen chain to activate the Gravepost point of grace.
Grab the map if you haven’t already then huge the north of the cliff and head west. If you keep following this path, you should see an opulent building ahead across a small gap in the rocks. Jump over the gap to avoid the fall and giant hand that crawls out of it. Once you’re safely on the other side, run forward and open the door. Go down the lift and activate the point of grace to get started.
Giant-Conquering Hero’s Grave guide

From the point of grace, you should be able to see a sealed door ahead. If you’re into incantations you may want to open it to find the Flame, Protect Me incantation, which will greatly increase your fire defense, and comes in handy for the rest of the dungeon. Whether you open the room or not, head down the stairs and wait for an enemy to pass by. Make sure that you have your highest fire and physical defense stuff equipped, then step in for a quick backstab. These enemies have various fire and melee attacks, and while you can stun-lock them during melee combos, they don’t stagger as much during their fire attacks, so watch out for that.
Once the enemy is dead, face the wall on the western side of the passage. Attack or roll into the left of the two wall sections to reveal it’s a fake. Walk to the end of the passage you just found, and pick up the loot you find. Next, jump out of the window to reach the back section of the lower area. Walk over to the circle of light on the floor, but make sure you don’t aggro the big lad down the stairs. The enemies in this dungeon can only be affected once they step into the light, but when they do so, they also suffer a brief moment of vulnerability, so take advantage of that to kill these two imps.
More traps and tricks
Once the imps are dead, ignore the stairs that are being guarded by a dark burial watchdog. Instead, head down the passage just off to the side. At the end of this corridor, you can see one of those flame-spitting pillars from other dungeons, but right now it’s not spitting fire. That’s because this area is here to trick you. The alcove just down the way that would usually make you safe, is currently inhabited by one of those flaming monks. Run in to draw his attention, then back out to the safety of the larger hallway behind you. Take him out carefully, as his sword has some pretty wide hitboxes.
Once the flame monk is dead, head towards the trap at the end of the corridor. You won’t have to worry about it going off unless you smack it. Once it’s active, it’ll make getting around this area much harder than it needs to be, so for now, leave it down. Head upstairs and wait for a few seconds beneath the overhang for a flame monk to show up. Aggro him then run downstairs again to get some more room. You can also abuse his bad pathing and the flame trap from earlier to take him out easily, but that’s down to your own preferred style of play. No matter what, just remember to deactivate the flame trap once you’re done using it.
More locked doors

Back in the main room, head upstairs and pick up the grease on the corpse. There’s another locked door here, so if you’ve got the stuff to open it you can feel free to do it. If you’re going to tackle the room though, you’ll need to activate the fire trap safely from the top of the stairs to complete the floor in the room beyond. This gives you a circle of light that you can use to take out the dark imps that are waiting beyond the locked door. There are 3 imps in total, once they’re taken out, you can grab the interestingly-named Warhammer waiting for you on a corpse. Don’t forget to smack the circle in the floor again to reactive the fire before you move on.
Back in the main chamber, head forward, and get on the lift ahead. Once it lands on the ground, send it back up without you on it to activate the light seal. Open the lever ahead to reveal a dark giant waiting in the room beyond. Aggro him, then lead him into the light pool to take him down. This guy isn’t that complex, much like the other giants in the game, but he does a lot of damage and can probably one-shot most characters. If you’re fed up with trying to take him on, you can always just jump off the ledges in his room instead, which opens up an easier way of beating him.
Opening the Giant-Conquering Hero’s Grave boss door

When you hit the bottom, there will be a huge fire enemy to take on, but it’s worth it for the great grave Glowwart he’s guarding. You can kill him really easily by exploiting his pathing. Stand in the tunnel at the northern end of the room and shoot the enemy while he’s coming towards you. Quickly drop down the hole at the back of the room, and climb up the nearby ladder. From here, wait a few moments for the enemy to return to its original position and start the process over again. Do this about 3-4 times and he’ll die, giving you free access to the area. Loot everything, then drop back down that hole from before.
Ahead are two dark burial watchdogs who you can’t hurt. To fix this, run to the end of the western end of the room and climb up the ladder on the right behind the watchdog. Up here, you can loot some Glowwart and should be able to see the now-vulnerable troll ahead of you. If you want an easy kill, use a bow to lure him in, then take pot-shots at him, occasionally dodging his shouts. Once he’s dead, you can open the door behind him and you’ll finally have access to the boss room, and the boss, who is disappointingly easier to kill than the troll is.
More Elden Ring content
We’ve been waiting to get our hands on FromSoftware’s Elden Ring for so long, we almost can’t believe it’s finally arrived and we have a massive amount of content just for you. Other than our Tier List, We’ll be here to walk you through every step of your journey through the Lands Between. Join us for all our Elden Ring content and guides over the coming days and weeks!


