WePC is reader-supported. When you buy through links on our site, we may earn an affiliate commission. Prices subject to change. Learn more
Last Updated:
Peripheral software is a dime a dozen these days and with good reason. As peripheral customization reaches new heights, the standard Windows mouse options don’t make the grade. Mouse manufacturers have, therefore, cooked up an array of proprietary solutions to customize their wares.
Here we take a look at Logitech’s offering for its peripherals released pre-2019 with the aptly named Logitech Gaming Software (LGS). Logitech G Hub is the newer version of this software, which covers all Logitech peripherals released in and after 2019, although efforts have been made to port over some of the older products as well. If you have pre-2019 kit, it may be that you prefer the LGS setup to the newer software, even if your peripherals have been ported across, in which case this article is for you. If you fancy the newer program however or aren’t sure which to go with, check out our separate guide on Logitech G Hub.
What Is Logitech Gaming Software?
Logitech Gaming Software is a standalone app that runs in the background with low resource demands on the system. It dramatically simplifies the process of setting up and personalizing Logitech devices for games through an array of settings.
Features & Benefits Of Using The Logitech Gaming Software
With LGS you can create custom macros, bindings, and commands assigned to profiles that are either user-defined or associated with specific games. Logitech also supplies default profiles from an extensive library of games from League of Legends to Call of Duty Black Ops 4 and everything in between. Each profile is entirely customizable, and LGS will automatically detect the game being played and switch to the appropriate profile seamlessly.
If the peripheral in question has onboard memory, LGS allows the user to save preferences and settings that will work on any PC without the need to install LGS or other peripheral customization software.
Additionally, LGS allows DPI sensitivity tweaks, RGB tuning for devices with backlighting, profiles for different surfaces, and monitoring information such as battery status.
Finally, LGS has a keypress and key duration heat map function that monitors the frequency at which keys are pressed and for how long.
And for the all-important question of why LGS is worth your time; it all comes down to the ability to personalize your peripherals to particular games and change settings on the fly. Whether you want to customize building macros for Fortnite or assign a weapon switching button in CSGO, LGS enables you to do just that.
Logitech Gaming Software Installation, Updating, and Uninstalling
How To Install Logitech Gaming Software?
Download the Logitech Gaming Software installer right here from the Logitech website.
Once downloaded, double click on the executable and follow the installation wizard.
How To Update Logitech Gaming Software?
Load up LGS and hover your mouse over the ”Help” question mark icon in the bottom right-hand corner, when the upwards pointing blue arrow appears, click on it and select ”Check For Updates”.
LGS automatically loads a utility called Logitech Updater which will check for an updated version of LGS and if available, downloads and installs it automatically.
How To Uninstall Logitech Gaming Software?
Click on the Windows Start menu and select Control Panel, then choose ”Uninstall a program”. Select Logitech Gaming Software from the list and click on ”Uninstall/Change”. When asked ”Are you sure you want to uninstall Logitech Gaming Software”, hit ”Yes”. The uninstall wizard will do its thing and remove LGS from your PC.
Adding Devices To Logitech Gaming Software And Changing Settings
Does LGS work with all Logitech peripherals?
As mentioned any Logitech peripherals made during and after 2019 will require Logitech G Hub to run. Before this date though – Yes and no. LGS is predominantly geared towards gamers who need settings specific to games and as such many of the office peripherals flogged by Logitech don’t benefit from using LGS. As such, LGS only works with Logitech’s gaming peripherals bar a few exceptions.
Here an exhaustive list of all compatible peripherals:
It couldn’t be simpler: plug the device into one of your PC’s USB ports. LGS then automatically adds the device, and you’ll be able to tinker with settings immediately. If you have a wireless device, follow the installation instructions that came with it and LGS will detect it automatically.
How To Create Custom Profiles?
Make sure you are in Automatic Game Detection mode, then click on the ‘’Customize Buttons’’ icon in the bottom menu.
In the top ‘’Profiles’’ box, click on the ‘’+’’ sign to create a new profile.
From here, assign a name and description for your new custom profile, select which games/apps use the profile in the section just below and finally determine whether you want to ‘’Lock profile while the game is running’’ by checking or unchecking. We recommend locking the profile to avoid any surprises while playing.
How To Import Custom Profiles?
Go to Automatic Game Detection mode, then click on the ‘’Customize Buttons’’ icon.
In the ‘’Profiles’’ box at the top of the window, click on the folder icon titled ‘’Import/Export’’, then select ‘’Import’’ from the drop-down menu that appears.
Select the custom profile from your PC folders.
How To Set A Default Profile?
Switch to Automatic Game Detection mode, and head to the ‘’Customize Buttons’’ section.
Hover over the profile you want to make the default and click on the downwards pointing blue arrow and select ‘’Set As Default’’.
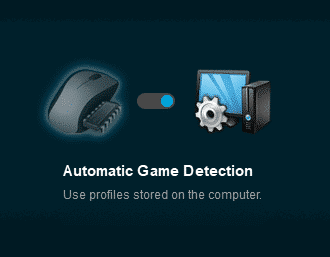
What’s The Difference Between On-Board Memory and Automatic Game Detection Modes?
On-Board Memory mode saves profiles and setting tweaks to the device itself, while Automatic Game Detection Mode houses profiles on the PC by assigning them to specific games. Changes made in On-Board Memory mode are linked to the mouse and will carry over to a different computer.
How Do You Assign A Command/Macro In On-Board Memory Mode?
Make sure LGS is set to On-Board Memory by navigating to the house icon in the bottom menu and checking the toggle is set up appropriately. If not, switch it over.
Click on the second icon in the bottom menu (mouse with a memory chip or G key).
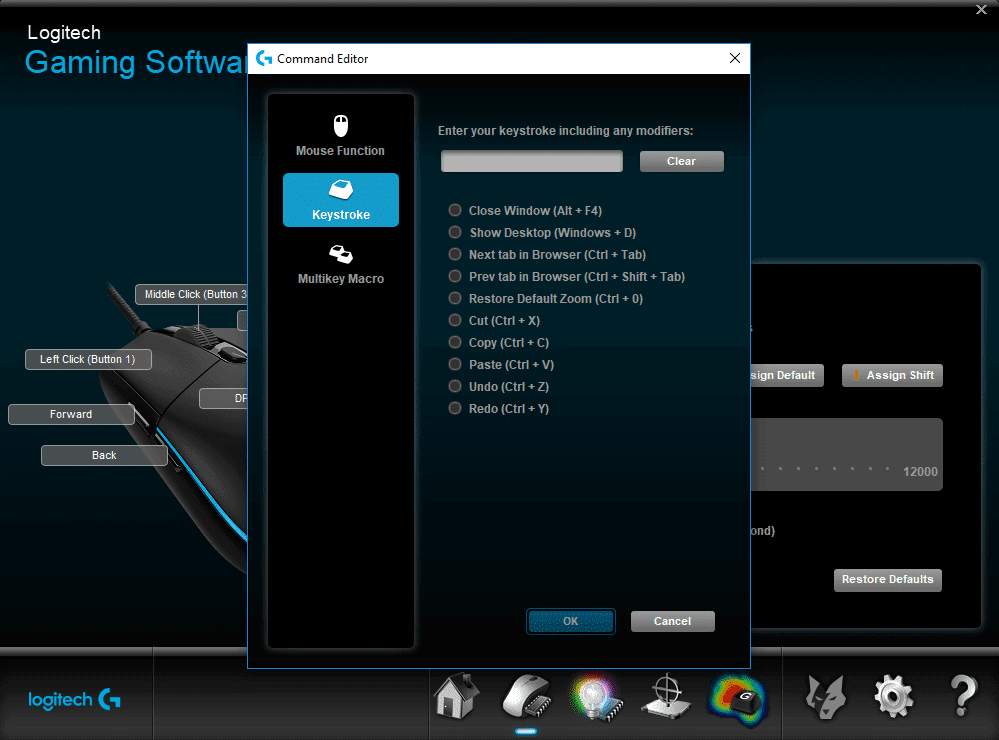
Note the downward pointing blue arrow that pops up when you hover over any of the mouse buttons or keys. Clicking on it reveals a list of options: Assign New Command, Edit Command, Use Generic, Unassign (certain buttons such as the main left/right click buttons allow further options such as switching).
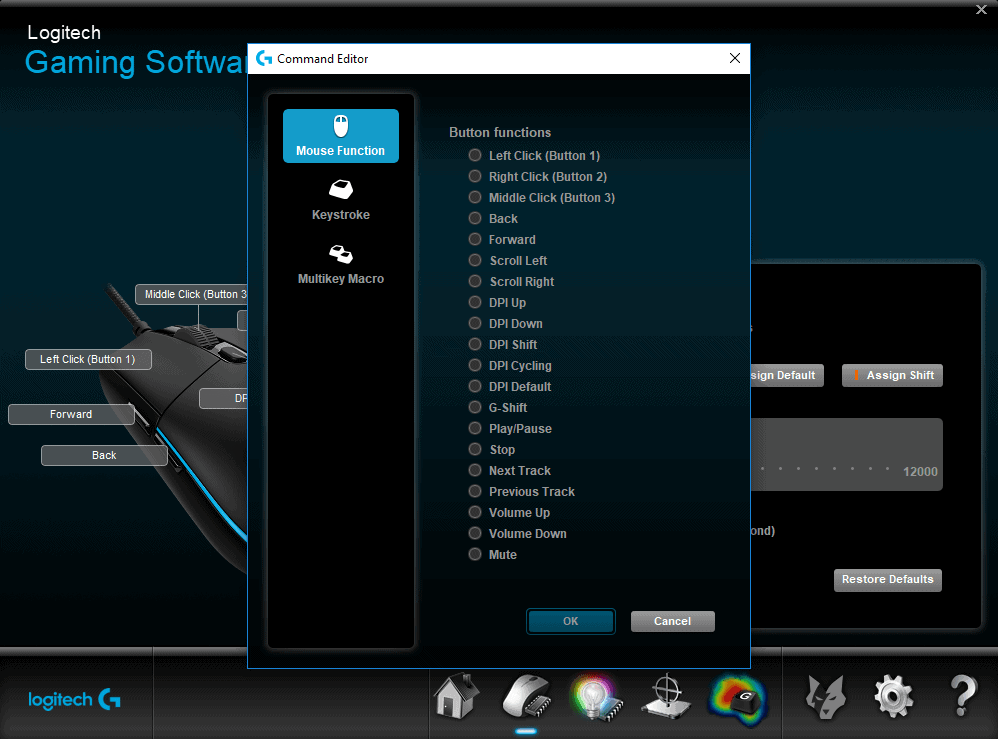
Select ‘’Assign New Command’’ to bring up the command editing window.
Three editing options are available: Mouse Function, which allows you to mix up button functions to anything from left click all the way to mute, Keystroke that assigns a simple keystroke or modifier, and finally, Multikey Macro for more complex keystroke combinations.
From here, select the option you need or type in the keystrokes, and hit ‘’OK’’.
Any changes will show up on the mouse model in the previous window.
The process is very similar for keyboards with onboard memory although Logitech currently only ships two such models.
How Do You Assign A Command/Macro In Automatic Game Detection Mode?
Switch over to Automatic Game Detection Mode, then click on the second icon in the bottom menu showing a mouse with arrows pointing down and right or a G key.
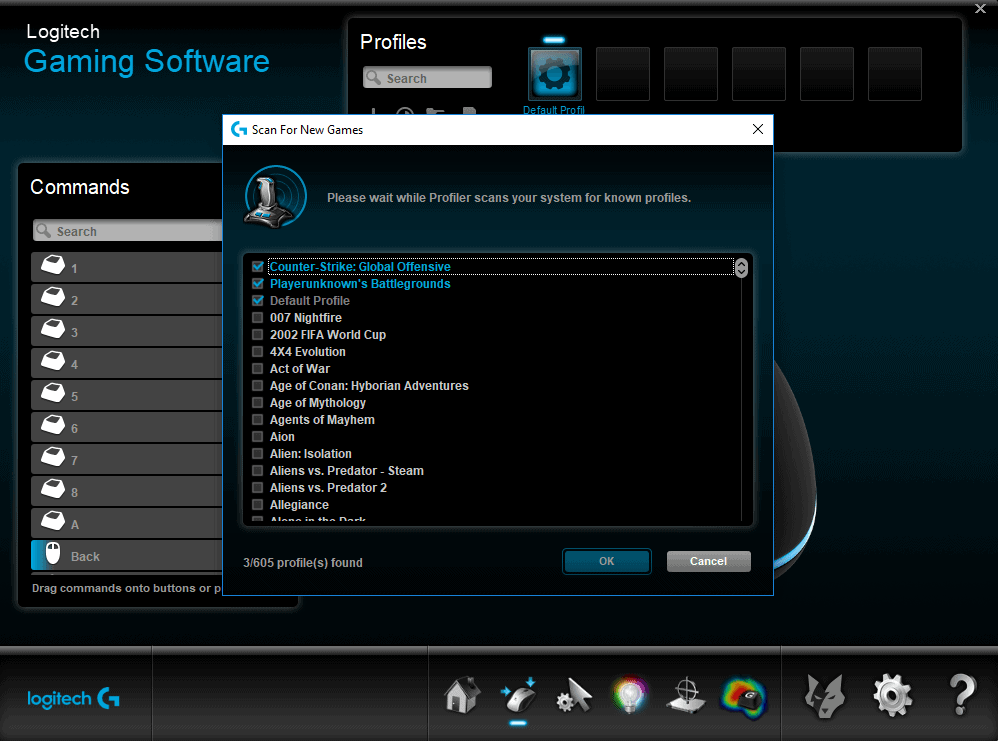
Along the top, note the ‘’Profiles’’ box. Here you can add a new profile, scan your PC for installed games, import/export profiles, and print profiles for easy reference when playing.
To select a profile, click on the relevant icon to the right. If you are using LGS for the first time, only the Default Profile will appear.
On the left-hand side of the screen you’ll see the ‘’Commands’’ option, and while useful for more advanced tweaking, the mouse/keyboard image on the right is much easier to navigate.
To edit a command, click on the downward pointing blue arrow that appears when you hover over a button or key and select ‘’Assign New Command’’ to open up the editing window (for keyboards, the actionable buttons are limited to macros and non-standard QWERTY keys).
From here you can assign single keystrokes, multi-key macros, text, standard mouse functions, media controls, editing/screen capture/general desktop shortcuts, other software, and Ventrilo audio options like muting microphones and push-to-talk options.
Make the required changes and remember to hit ‘’OK’’ to save them.
How Do You Change DPI Sensitivity Levels?
In On-Board Memory mode, click on the second icon in the bottom menu that features a mouse alongside a memory chip. In Automatic Game Detection Mode, click on the third icon representing a mouse pointer and a cogwheel.
The ‘’Number of levels’’ drop-down determines how many incremental DPI jumps you’ll have access to via the DPI cycling button(s) on the mouse. Set the number as desired.
Below you can individually tweak each of the levels by either clicking on the numerical DPI value and typing it in manually, or using the up/down arrows. The meter is quite simply a visual representation of the DPI settings on the left-hand side.
You can also tweak the Report Rate to 125, 250, 500, and 1000 reports per second to further customize the DPI sensitivity.
How Do You Assign A Profile Cycling Hotkey?
Head to ‘’Settings’’ by clicking on the cogwheel icon in the bottom right-hand corner.
Click on the ‘’Profile’’ tab along the top.
Under ‘’Profile Cycling’’, click on the input box and hit the hotkey you want to use for cycling.
How Do You Change Lighting Settings?
Navigate to the light bulb icon in the bottom menu.
On the right-hand side is a window to toggle which parts of the peripheral light up (for example the logo).
Under the ‘’Lighting Effect’’ drop-down, you select whether the RGB produces a solid color, cycles through multiple colors, and creates a swelling breathing effect among other effects.
Below you can determine the brightness and the speed at which the color changes as well as set up a sleep timer for the lighting to conserve energy.
By clicking the ‘’Enable per profile backlight settings’’, you can assign specific settings to different profiles.
The small window on the left determines the color. If you’re happy with a particular color, click on one of the squares under ‘’Custom’’ to save it.
Remember that the settings apply to the mode so switching from On-Board Memory to Automatic Game Detection changes the backlighting settings.
How Do You Assign A Specific Profile To A Game?
Go to Automatic Game Detection mode, then click on the mouse with arrows icon in the bottom menu.
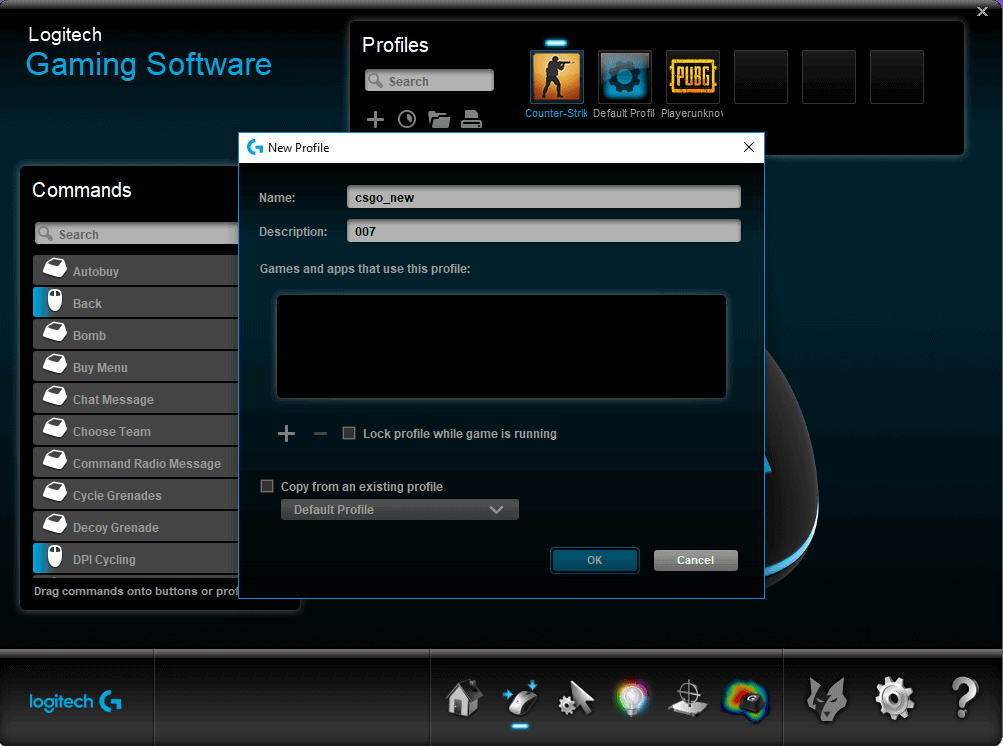
In the ‘’Profiles’’ window along the top, click on the plus symbol to create a new profile or hover over an existing profile and click on the downward pointing blue arrow and select ‘’Properties’’.
If you’ve created a new profile, you can define a name, description, and copy over the settings from an existing profile.
To add a specific game, click on the plus symbol underneath the ‘’Games and apps that use this profile’’ box, then select the .exe file from your PC for the game you want to assign.
Click ‘’OK’’ to confirm.
If you are changing an existing profile, the process is identical.
Common Questions - Logitech Gaming Software
How To Make Logitech Gaming Software Open On Startup?
Click on the ‘’Settings’’ cog wheel in the bottom right and under the ‘’General’’ tab tick the ‘’”Run this program when Windows starts” option.
How To Stop Logitech Gaming Software Opening On Startup?
Click on the ‘’Settings’’ cog wheel in the bottom right and under the ‘’General’’ tab untick the ‘’”Run this program when Windows starts” option.
How To Disable Logitech Gaming Software?
Short of uninstalling LGS, the easiest way to disable the software is to ensure the Windows startup option is toggled off and close the program.
Troubleshooting - Logitech Gaming Software
LGS Won’t Open, What Should I Do?
If LGS won’t open, or if it does and closes immediately, the firmware on the device itself may be causing issues. To circumnavigate the problem, unplug your Logitech device and launch LGS, then plug the peripheral back into the machine. The program will prompt you to update the firmware. Follow the on-screen instructions. When finished, LGS should boot up.
LGS Won’t Recognize/Detect A Device (Mouse, Keyboard, Headset), What Should I Do?
Here are some possible fixes:
Check that the device is compatible with LGS.
Verify that the USB cable is connected correctly.
Download and install the latest version of LGS from the Logitech website.
As a huge fan of RTS and fast-paced FPS, Will has been playing games since the days of the original Command and Conquer and has many fond memories of sending waves upon waves of attack dogs to destroy the enemies infantry in Red Alert. Nowadays, he plays Shogun Total War, CS GO and, RS2 Vietnam.