How To Optimize Windows 10 For Gaming
A comprehensive guide to optimizing Windows 10 for gaming
Share this article...
WePC is reader-supported. When you buy through links on our site, we may earn an affiliate commission. Prices subject to change. Learn more
If you want to make the most out of your gaming PC’s performance, you’ll want to know how to optimize Windows 10 for gaming. Windows 10 remains a highly popular operating system for gaming, even following the release of Windows 11. So, we’re going to be taking you through everything you need to know if you want the most optimal gaming performance on your Windows machine.
PC gaming is widely considered to be the most immersive kind of gaming available in the modern age of computing with its ability to create life-like graphics, incredible gameplay and a plethora of peripherals to give the user the feeling of total control and comfort.
However with technology moving along rapidly and games now requiring the latest up-to-date hardware, a lot of people do struggle to maximize their gaming experience. If you’re one of those lesser fortunate folks who can’t quite afford the latest CPU or GPU, there are a few tricks you can do to help boost your gaming experience. In this article, we’re going to outline how you can optimize your Windows 10 package to help boost gameplay and FPS by tweaking and disabled everything that reduces the performance of your gaming PC.
Keeping your system up to date
The first thing every PC gamer should do and be aware of is the importance of keeping your system up to date. Now, what exactly does that mean? Well, it means making sure Windows has the latest updates installed and more importantly making sure your GPU is up to date. Windows does its own updates pretty efficiently by automatically installing the latest updates when they’re available, however with your GPU Windows isn’t quite as quick off the mark.
As a gamer, your GPU driver not being up to date could be the difference between seamless smooth gameplay and BSOD and constant crashing. No one enjoys that. So, the first thing we would recommend doing in the quest for total gaming optimization of Windows 10 is to firstly, check your Windows is up to date, then check your GPU drivers are up to date and below we will describe the best way of doing that.
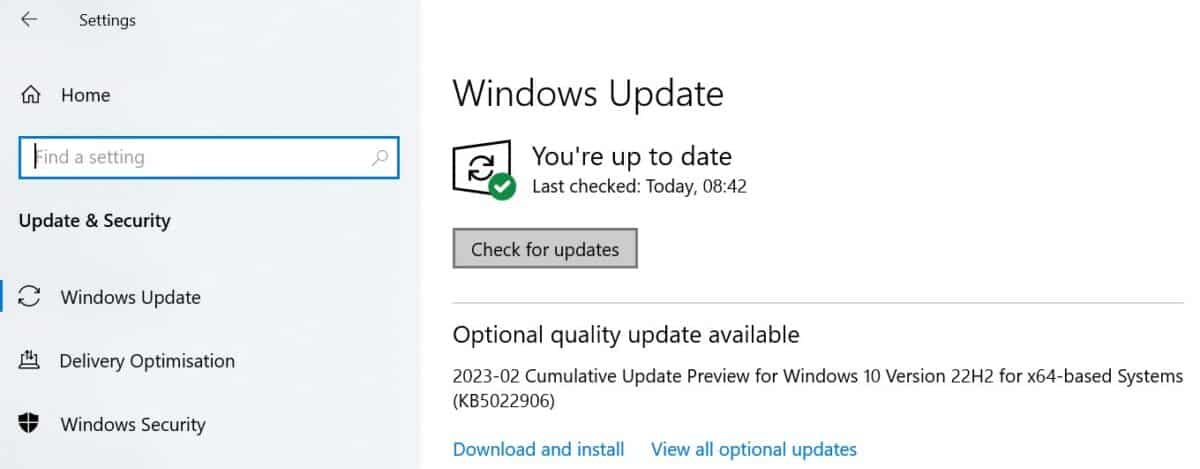
Windows 10 update
Step
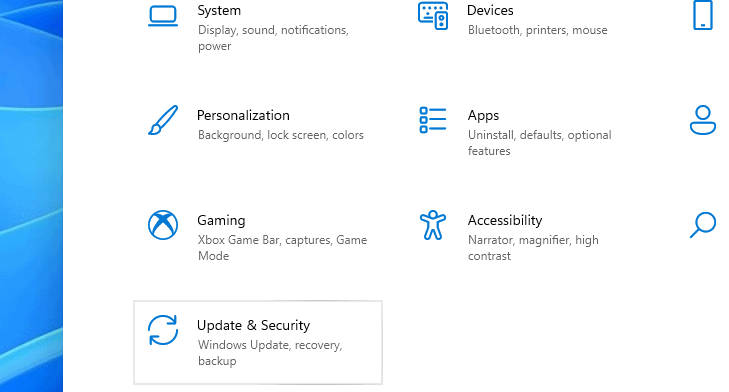
Access Windows Update settings
- Go to the Windows icon in the bottom left-hand corner of your desktop.
- Click the ‘settings’ tab (the little wheel).
- Find and click the Update & Security tab.
Step
Install Windows updates
- Inside Update & Security make sure to click on Windows update tab.
- Inside Windows update, you will see any outstanding updates waiting for installation.
- Install, restart, and reboot.
GPU Driver update
- Find the make and model of your Graphics card
- Go to the manufacturer’s website and search for your GPU model
- Download and install drivers
- Reboot your system and you are up to date
So there you have it, it’s as simple as that, make sure your GPU drivers and Windows are always up to date stopping any system errors and game crashes in crucial situations!
Windows Visual Effects settings
The next thing we always recommend doing is customizing the windows visual effects settings which can definitely sap some of your PC’s performance. It is worth mentioning this section is primarily for lower-end PC builds, many of the higher-end builds will not be affected by these changes but we will touch on them regardless.
If you do wish to disable any of the visual effects then follow our simple step-by-step guide below:
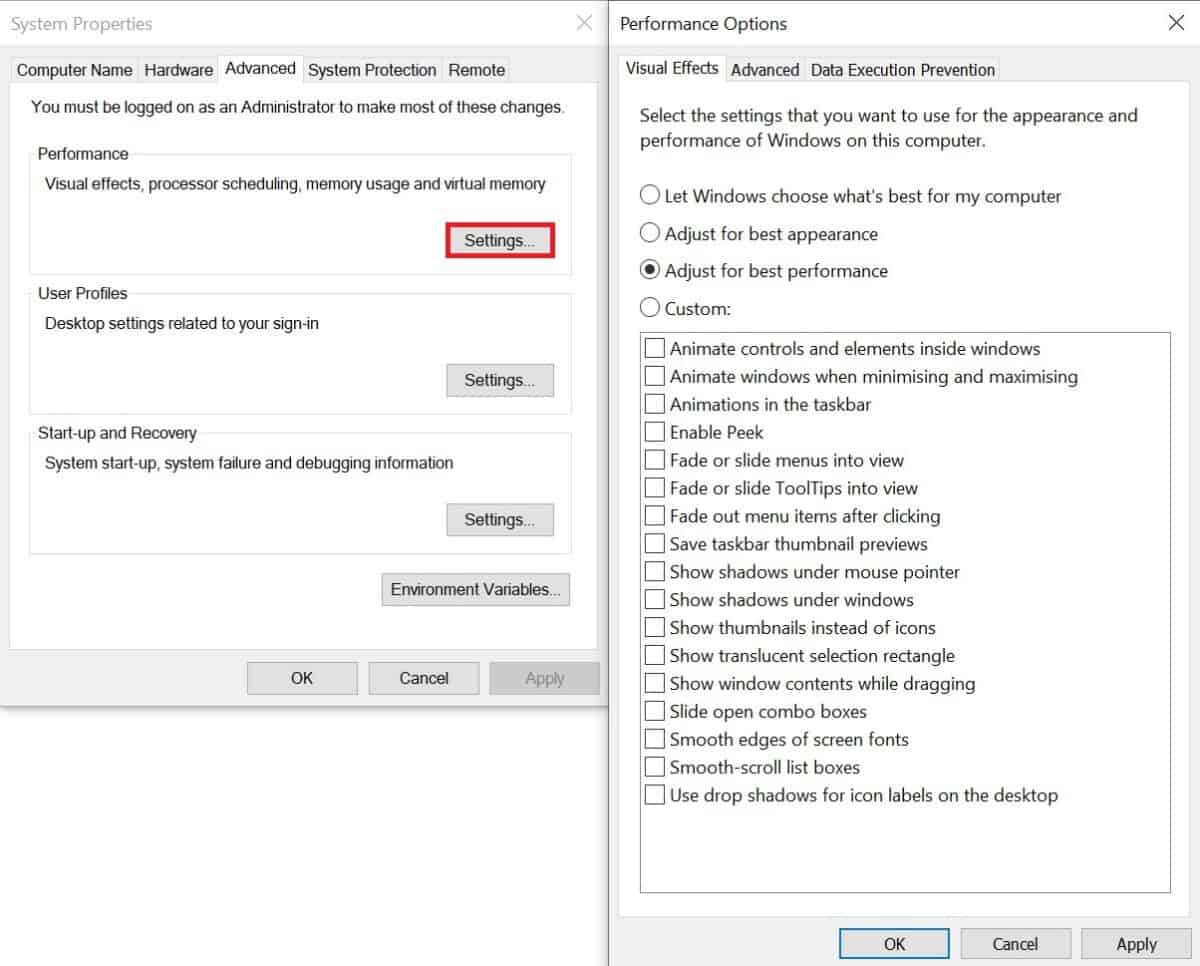
Step
Edit advanced system settings
- Type ‘Advanced system settings‘ in the desktop search bar, bottom left-hand corner of the desktop.
- Underneath advanced settings make sure ‘Advanced‘ tab is selected.
- At the top, you will see performance settings, click the settings box.
- In the pop-up window you will see visual effects and 4 options.
- Select the ‘Adjust for best performance‘ option and apply.
This will change your system’s visual effects and help boost your PC’s performance slightly. If you find this does help it might be worth upgrading your RAM if your motherboard allows.
Setting Windows to High Performance
Another really quick change you can make to Windows 10 are the performance settings, which by default are set to balanced meaning windows will set your CPU speed to only use the power required to run the tasks currently open. It does this to save overall power and battery life in laptops, so for gamers this is not the optimal setting to use.
This being said, by setting your performance settings to high Windows will now change your CPU speed to always run at its maximum which, in some cases, will boost your in-game experience.
Changing your performance plan is really straight forward, below are the steps required to optimize this:
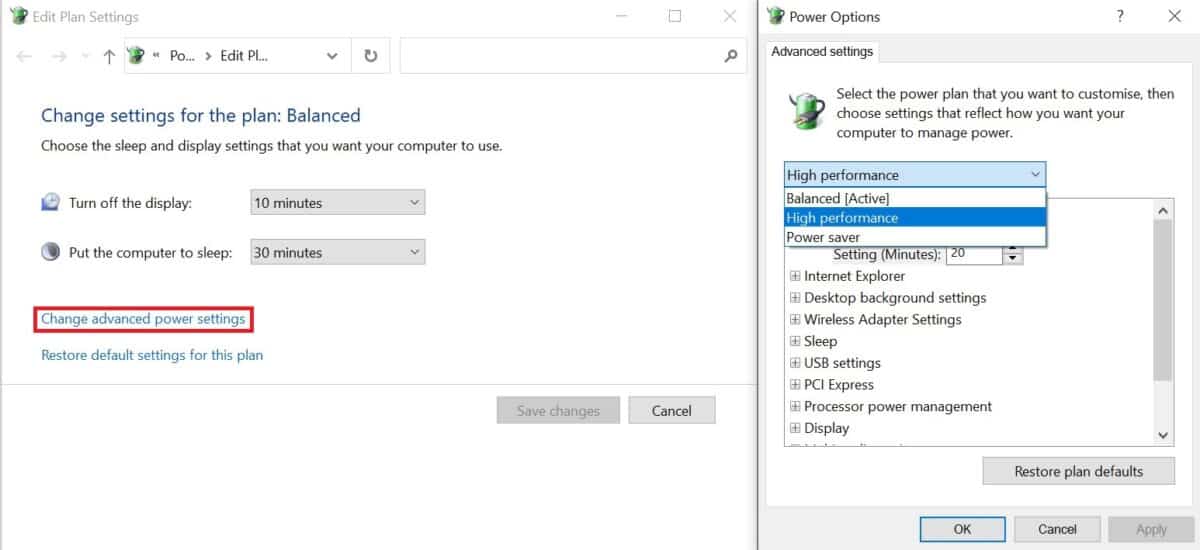
Step
Change advanced power settings
- In the Windows start menu / desktop search bar type ‘Power Plan‘.
- The pop up window will display your current settings and a ‘change advanced power settings‘ below.
- Click the tab to bring up advanced settings.
- In the drop down menu select the ‘High performance‘ and click apply.
Like above this is going to be more effective on lower end PC’s so if this doesn’t make a huge difference the following steps may be more successful.
Using Windows Game Mode
Game mode is a new innovation that windows have implemented to boost performance and works by optimizing your computer’s hardware to focus the majority of its power on whichever game you are playing. Very handy. It changes the priority of the other background tasks to low whilst boosting the game’s priority to maximum.
To enable Game Mode simple do the following:
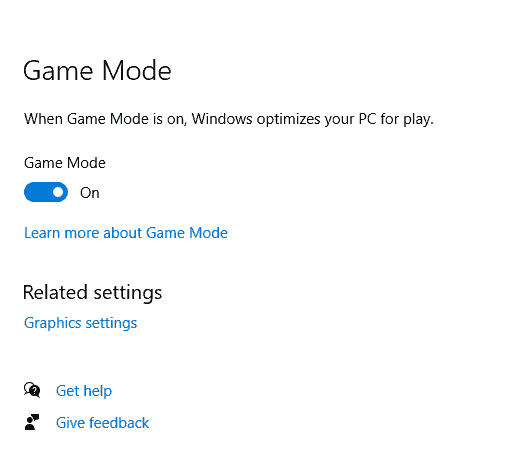
Step
Enable Game Mode
- In ‘windows search’ type ‘Game Mode‘ and press enter.
- This will open up the ‘Gaming‘ app and should have selected ‘Game mode‘.
- In Game mode you will see a toggle which both enables and disables Game Mode.
- Simply select ‘On‘ to enjoy Game Mode features.
Game mode has a bunch of other features to boost your overall gaming experience but are quite sapping on your CPU so we wouldn’t recommend trying those out. However if you’re computer is running solidly certainly check out what game mode has to offer.
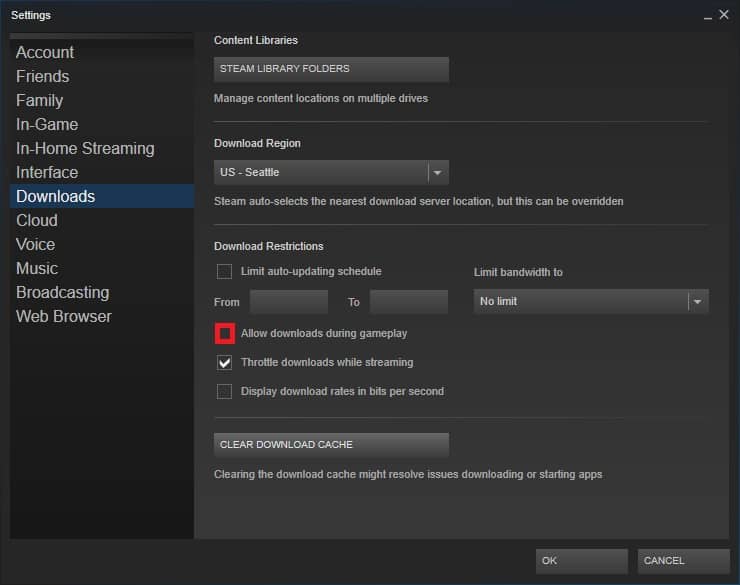
Optimize your Steam account
Steam is used globally and for good reason, however, live updates can be a real pain when set to automatic as they have the tendency to tab people out in the most awkward of times, not to mention the ping spikes if it doesn’t. This can be disabled though and we would certainly recommend doing it to stop this ever occurring.
Step
Disable Steam downloads during gameplay
- In Steam, click the Steam tab at the top and select settings from the drop-down menu.
- In Settings, select downloads from the menu on the left.
- In Downloads, untick allow downloads during gameplay.
And that’s all there is to it, if it is already unticked then obviously leave it unticked and you are good to go. If not, definitely change this setting.
Upgrading your hardware
You may be asking yourself at this section, how is upgrading my computer in any way optimization of Windows 10? And to be fair, you’re correct. However, what is worth noting is hardware that dramatically changes the loading time of windows 10 and games a like.
SSD are not a new concept but are hugely important when it comes down to load times due to their design and technology. With an efficient running windows it can actually reduce the overall stress that windows puts on a system. With an SSD, your windows loading time will be reduced massively, as will any game installed onto it. For example, PUBG on a HDD took anywhere from 45-60 seconds, when transferred to SSD loading time was reduced to under 10 seconds. So you can clearly see the benefits.
Conclusion
Ultimately, Windows 10 is a fantastic, user friendly package which allows for plenty of customization to help boost your PC’s overall performance especially in terms of gaming. The above tips are the best place to start when trying to tweak your system. However, at the end of the day, if you want a truly dramatic change in performance your best bet is to bite the bullet and upgrade your hardware to make it both up-to-date and future proof.