Windows 11 optimization guide: get the most out of Microsoft’s OS
How to optimize Windows 11 for gaming
WePC is reader-supported. When you buy through links on our site, we may earn an affiliate commission. Prices subject to change. Learn more
Windows 11 has officially been released for a while now. The new OS marks the 40th major release of Windows to date, and with it comes a whole host of new features and tweaks over the much-loved Windows 10. But, where there are options, there are optimizations to be made. We’re going to go over some of the new gaming-focused features that ship with Windows 11, and how to optimize the operating system to help you achieve the best performance in-game.
Windows 11 updates
Most importantly, you must ensure that you are running the latest build of Windows 11. Windows Update is how Microsoft pushes out the latest bug-fixes and features. Keeping your OS up to date is important not only for gaming, but also for security purposes. Each update gives the OS the latest information about viruses and updates the Windows Malicious Software Removal Tool. Both of these are delivered via Windows Update. Additionally, they’re crucial to overall system health so you aren’t going to have a good gaming experience on a PC that’s compromised by sophisticated viruses.
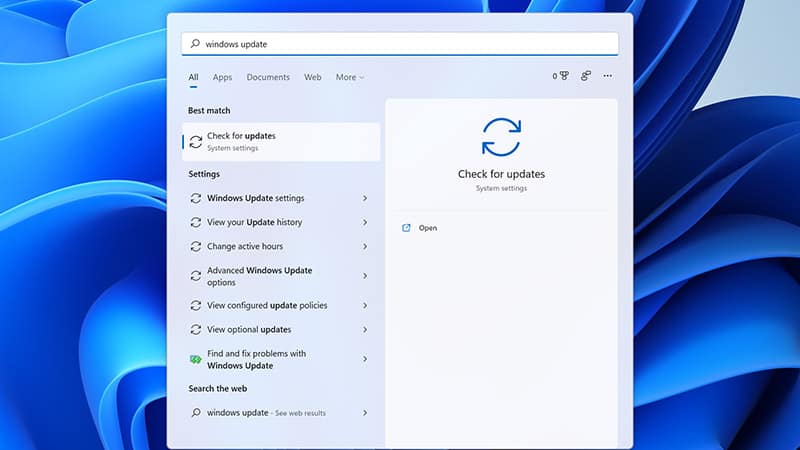
Follow the steps below to see how to do this.
Step
Simply navigate to the dock (i.e the taskbar), type ‘Windows Update’ and select the appropriate option.
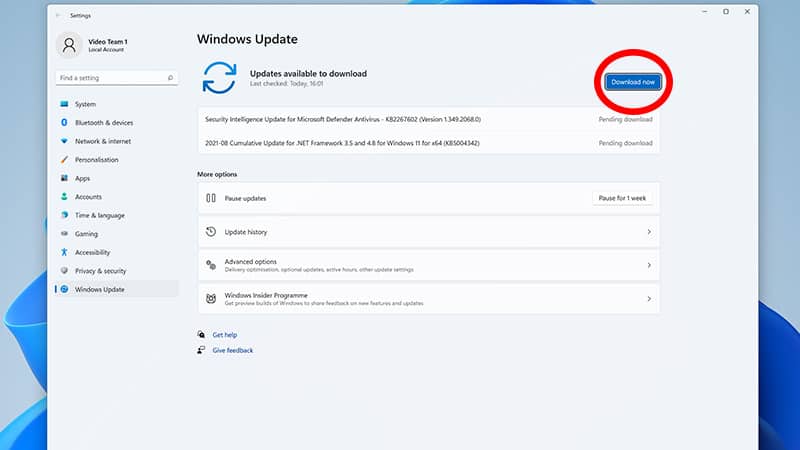
Step
Check for updates
Once on the update screen, you can go ahead and select ‘check for updates’. Windows will then automatically scour Microsoft’s Update Server for any available updates. Windows Update will then download the latest build.
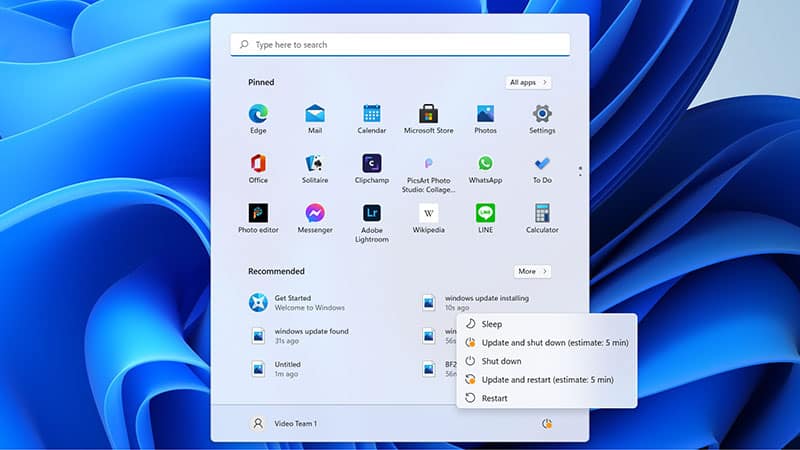
Step
Restart your PC
Once the update is completed, restart your PC. If time is scarce then this is completely optional. You can choose a shutdown state when you go to turn off your PC, selecting either ‘Shut down’ or ‘Shut down and install updates’. Windows 11 even gives you a handy estimate right there under the option so you can get yourself a brew while it does its thing.
Windows 11 compatible drivers
It’s extremely important to make sure all of your relevant GPU and chipset drivers are up to date. A device driver is a computer program that operates or controls a particular type of device that is attached to a computer. Think of the device as a car, it has the ability to drive, just not without a ‘driver’. Teslas not included.
Again, simply follow the steps below in order to install the latest drivers.
Step
Locating drivers for your hardware
First off, navigate to your device manufacturer’s website and select your make and model of device. Whether that be a GPU from Nvidia or AMD or a motherboard from Asus, the process is very similar across the board.
With GPU drivers specifically, you usually have handy software that will download and install updates automatically. These are ‘Geforce Experience’ for Nvidia GPUs or the ‘Radeon software’ for AMD GPUs. You can also install chipset drivers through the Radeon software, as AMD also manufactures CPUs. Since Nvidia doesn’t make CPUs, don’t expect any chipset drivers in Geforce Experience.

Step
Driver Installation
When you have obtained the appropriate software, run it and follow the installation steps. All programs are slightly different but follow the same basic installation instructions.

Windows 11 start-up optimizations
A big part of a PC’s boot process is to load any enabled startup apps upon the launch of the Windows OS. ‘Enabled apps?’’ you say, ‘but I didn’t enable any startup apps.’ Do not worry: some apps insert themselves into the startup process because they think they’re important and need your attention straight away, but for most things, it’ll just bloat up your startup process.
Good examples of resource-draining startup apps are: Discord, Origin, Steam, and Utorrent.
But don’t fret, we’re going to show you how to disable all of these greedy, resource-hogging apps.
Step
Launch Task Manager
Firstly, navigate to the Windows 11 icon on the dock, right-click it and launch your trusty Task Manager.

Step
Disabling start-up apps
Within Task Manager, click on ‘Startup’ and disable any undesirable apps from launching on startup to safeguard your precious system resources, saving the hassle of going and closing all the apps you don’t want running when gaming. You can always re-enable them here if you change your mind later, too.

Uninstall apps in Windows 11
Love them or hate them, we all need apps to be installed on our PCs. But, sometimes you might have needed an app for one specific thing and no longer need it now. The same can be said for random files. It’s important for OS performance to keep your used disk space as low as possible. We’re not saying to go and strip your OS down to just Microsoft Paint and Edge, but to keep it in reasonable order.
The below steps will show you how to do this:
Step
Launching ‘add or remove programs’
To uninstall apps you don’t need, simply hit the ‘Windows’ key on your keyboard and type ‘add or remove programs’. Then, click ‘add or remove programs’ from the start menu. This will bring you to ‘Apps & Features’, with a list of all the apps and programs installed on the PC.

Step
Uninstalling an app or program
To uninstall something, simply click on the three dots aligning the right side of the box and click ‘uninstall’. Windows will then uninstall the app or program for you. If the app is a third-party app or program, it might ask you to go through further steps. These are simple, just follow them and you’ll be rid of the offending program in no time.

Windows 11 Power Plan optimizations
Power Plans aren’t as important for desktop PCs as they are for laptops. If you are running Windows 11 on a laptop, your laptop’s manufacturer could have already configured custom Power Plans. For example, when your laptop drops below 30% battery, your laptop may switch to a power-saving mode to conserve battery life. Sometimes, the power-saving plan can remain active even while charging your laptop.
Step
You can change your Power Plan fairly easily. Simply open your search bar and type ‘Edit Power Plan’, then click on the Edit Power Plan settings.

Step
Changing your power plan
Head to Power Options at the top and choose the Power Plan that prefers ‘Maximum Performance’. The names of your specific Power Plan may differ slightly, if you’re running a laptop. However, there’s usually a ‘max’ or ‘optimal performance’ option.

Desktop capturing and Xbox Game Bar
Windows 10 came with an inbuilt capture feature to allow you to record clips of games. Great, right? Well, not really. At least, not from a performance standpoint. Recording video is probably one of the most intensive things a PC can do. Hence why there are dedicated capture cards to do this for you.
Programs like Nvidia Shadowplay also exist as a lightweight alternative to Windows’s own capture features. If you’re intending to regularly capture video and content, it might be an idea to make use of Nvidia’s NVENC encoder, or use another dedicated system to capture on, as doing video capture of any kind can have a big impact on your PC’s performance.
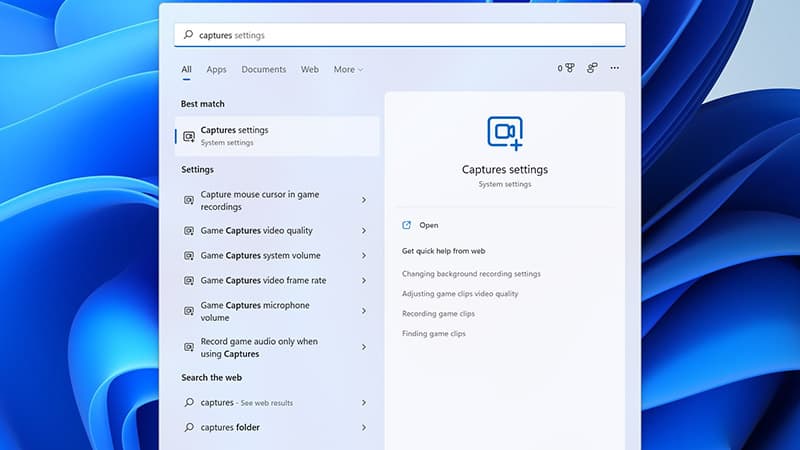
Step
Capture settings
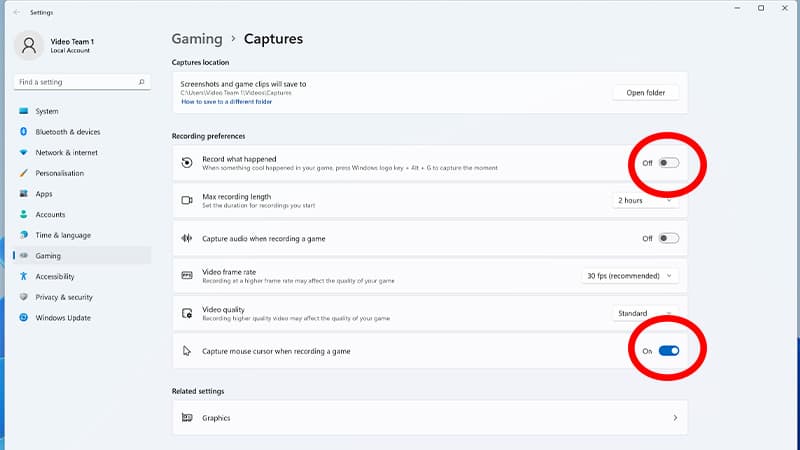
To disable Microsoft’s own solution, head into the start menu and type ‘Captures’ and select ‘Captures Settings’. This will bring you to the ‘Gaming > Captures’ option.
Step
Disable captures and recorded audio
All you need to do is disable ‘Record what happened’ and ‘Capture audio when recording a game’ by flipping the slider from on to off.
Step
Disabling the Xbox Game Bar
To configure the Xbox Game Bar, go to the ‘Gaming > Captures’ settings page we mentioned earlier and navigate to ‘Gaming’ on the left drop down menu and turn the Xbox Game Bar slider from on to off.

Windows 11 Game Mode
Since Windows 10, Microsoft has really been pushing the improvement of game optimization on Windows, and with Windows 10 came ‘Game Mode’ essentially allowing your game more CPU and GPU resources, while background applications get fewer. This feature is thankfully still present in Windows 11.
Game Mode had a rocky implementation in Windows 10, and actually impeded performance in a lot of cases while enabled. This is why you might see other less informed sources telling you to disable the feature. Thankfully this feature is now much improved and functions properly, offering slightly better performance increases in specific scenarios.
Step
Game Mode settings
To enable Game Mode, simply press the ‘Windows’ key on your keyboard, type ‘Game Mode’ and select ‘Game Mode Settings’ from the Start Menu.

Step
Enabling Game Mode
Then, slide the ‘Game Mode’ slider over to on. Simple!

Background apps in Windows 11
A feature that seems to be missing within Windows 11 was named ‘Background Apps’. This feature was a great way to optimize performance as disabling apps from running idly in the background had the potential to save a lot of system resources. This option was a feature in earlier builds of Windows 11 but now it seems to have gone the way of the Dodo.
Final word
There are a lot of things you can do to help improve gaming performance in Windows 11, so we hope that this guide helps you get to the perfect framerates that you deserve. But, this optimization guide will also help you in day-to-day use of your PC, and isn’t limited to gaming scenarios. Now, your Windows 11 installation will be free from the curse of random apps that open on startup, or Windows passively capturing video while you’re playing a game.