Enter The Battlegrounds With This PUBG Power PC Build
WePC is reader-supported. When you buy through links on our site, we may earn an affiliate commission. Prices subject to change. Learn more
PlayerUnknown’s Battlegrounds is taking the world of PC gaming by storm. Due to its indie developers and incredibly ambitious scale, the game is taxing for even the best PCs out there, and has a high barrier of entry for many budget PC gamers. 100 players sky-diving onto a huge island, scrounging through hundreds of resources and covering kilometers of ground in a nail-biting game of survival and death? Even the best-optimized game would have trouble handling all that action, and the indie developers behind PUBG unfortunately don’t seem to have that optimization down. Because of the optimization issues, it can be tough for many gamers to hop into PUBG. If you’re worried about finding a build that’s good for PUBG, don’t worry: we have you covered. With the build we’ve recommended below, you should be able to enjoy 1080p 60fps gameplay at high settings. As the devs get further into development, that performance should start to increase over time with the rollout of optimization patches. Ready to get into the crazy 100-man showdown that is PlayerUnknown’s Battlegrounds? Look no further: we have you covered.
PUBG System Requirements
On PUBG’s Steam page, minimum system requirements for PUBG are the following:
- 64-bit Windows 7 or newer Windows OS
- Intel Core i3-4340, AMD FX-6300 or equivalent.
- 6 GB RAM or more.
- GTX 660 2GB, Radeon HD 7850 2GB, or equivalent, supporting DirectX 11.
- 30 GB available storage.
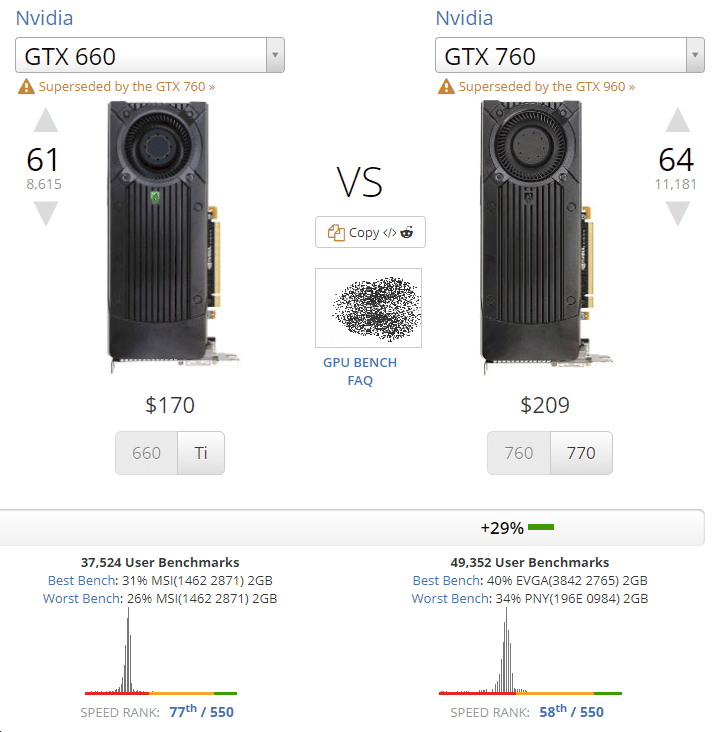
If you aren’t sure where your CPU or GPU falls in comparison to the required specs on this list, don’t worry, we have you covered. If you don’t know what your specs actually are, use Speccy to find out. Use this UserBenchmark page to compare your CPU to PUBG’s minimum spec CPU. Use this UserBenchmark page to compare your GPU to PUBG’s minimum spec GPU. As an example, I’ve embedded below the minimum spec GTX 660 vs my own desktop’s GTX 760.
Playing at minimum specs, you can expect 30-45 FPS on average at lowest settings, depending on ingame context. Keep reading if you want to see our PUBG Power Build (which will allow you to play at much higher settings and framerates), as well as our recommended settings to weak for low-end PCs.
Our PUBG Power Build
CPU: AMD – Ryzen 5 1400 3.2GHz Quad-Core Processor CPU Cooler: Cooler Master – Hyper 212 EVO 82.9 CFM Sleeve Bearing CPU Cooler GPU: OEM GTX 1060 6GB (NOTE: Due to the ongoing GPU shortage and other factors, this price will change and availability will as well. Feel free to replace with any GPU of equal performance, or another GTX 1060 at a lower price.) Motherboard: MSI – B350 PC MATE ATX AM4 Motherboard Memory: Patriot – Viper Elite 8GB (2 x 4GB) DDR4-2666 Memory Storage: Hitachi – Ultrastar 7K3000 3TB 3.5″ 7200RPM Internal Hard Drive Case: Thermaltake – Core G21 Tempered Glass Edition ATX Mid Tower Case Power Supply: Corsair – TXM Gold 550W 80+ Gold Certified Semi-Modular ATX Power Supply Total: $869 The beating heart of this build is the Ryzen 5 1400 CPU. While one of the most humble members of the Ryzen bloodline, the 1400 is cheap and easily-overclockable, allowing you to bring out even more performance-per-dollar than the stock Ryzen 5 1400. This CPU will have more than enough power for most gaming scenarios, and will even be good for light streaming and video rendering. We’ve included a Cooler Master Hyper 212 EVO with this build to allow for some overclocking wiggle room and much better thermal performance. If you’re an experienced overclocker and know for sure you’ll be wanting to do that, feel free to opt for a higher-end cooler. Completing the CPU-relevant components is the MSI B350 PC Mate Motherboard. This B350 motherboard will allow you to overclock your Ryzen processor, and is also a full-size ATX motherboard that will allow multiple GPUs and plenty of room for upgrades. It also has incredibly solid build quality, which makes it more enticing in the long-term. The 8GB of DDR4 Patriot Viper RAM is also well-suited to this build. It’s plenty for gaming and multitasking, and realistically is about as much as the common gamer or enthusiast actually needs. You can double it up to 16GB if you like, but chances are you won’t need to. The GPU here is an interesting note: we’ve bundled an OEM GTX 1060 6GB off of Amazon with this build. The GTX 1060 6GB should offer more than enough performance for playing this game at high settings, 1080p and 60FPS. With better-optimized games like Fortnite, CS:GO or Overwatch, the 1060 will absolutely annihilate and allow you to get upwards of 100 FPS in those titles, should they also interest you. That being said, there is an issue to address. Seeing as there’s a huge GPU shortage going on right now, chances are this GPU may be sold out or have a higher price by the time you get to it. If you’re getting to this a bit later down the line, the shortage may have calmed down. The 1060’s MSRP is $300, so try to spend around that amount on a 1060 or equivalent GPU. Otherwise, you may have to raise the price of this build by a couple hundred. GPUs below the 1060’s grade won’t get great performance in PUBG, unfortunately, and you probably don’t want to make huge sacrifices in your PUBG Power Build. The Hitachi UltraStar 3TB drive we’ve included in this build is stellar for its price, and should offer more than enough storage for your PUBG and other gaming needs. There’s not too much to talk about when it comes to hard drives besides storage capacity, though. Holding this build together is the Thermaltake G21 Mid Tower Case, boasting Tempered Glass for aesthetics and a huge interior that’s well-suited for all your component-packing, cable-managing and system-cooling needs. The tempered glass will also allow you to look at your build any time you like- if you’re inclined to add a few LEDs, you’ll always have some eye candy to enjoy inside your build. Plus, thanks to the size and build quality, you can count on great cooling performance and a sturdy, safe environment for your components. Last but certainly not least is the PSU, a Corsair TX550M Gold+ Semi-Modular Power Supply. Its Semi-Modularity will allow a much easier building experience with better cable management, while the Gold+ certification will ensure less excess heat is exhausted into your build and that less power is used on your power bill. It’s always important to buy a good PSU, and Corsair’s excellent TX series is one we’re always willing to recommend in our builds. With all those components combined, you now have a PUBG Power Build. Use it to its fullest extent to work your way to the top in PlayerUnknown’s Battlegrounds, and comment below if you need any assistance. Having trouble finding a part? Want any recommendations on alternative choices? Let us know and we’ll be happy to help!
Best Settings For PUBG
Regardless of your build, here’s some settings you can use to increase performance and visibility in PUBG.
Steam Launch Settings
Launch settings can be added to a game in Steam by right-clicking, selecting “Properties”, and selecting “Set launch options”. Every option starts with a – and you need to have spaces between options.
- -USEALLAVAILABLECORES – This option maximizes CPU utilization.
- -malloc=system – This option gets Windows to manage RAM allocation.
- -sm4 – This option uses DirectX 10 shaders instead of DirectX 11, which removes some effects and may increase performance.
- -lowmemory – This option helps alleviate memory leaks, and can allow the game to be more easily played with lower amounts of RAM.
All of these options, sans -lowmemory, are recommended for all users.
In-Game Settings To Change
For the most part, there’s not much to talk about here. Changing settings to “Low” or “Very Low” will generally have the intended effects. There are a few particular in-game options worth expanding on, however:
- Texture Quality may perform better with higher settings, depending on the VRAM available in your GPU. If using 2GB or less, setting this to Very Low is safe- if you have more to spare, experiment with this setting.
- Anti-Aliasing set to Very Low should provide at least a slight performance increase, but due to the more lightweight FXAA implementation in PUBG, this may not do much.
- Motion Blur should be disabled- not only can it tank FPS, it makes things harder to track in the heat of the moment.
- Screen Scale may provide a performance boost if set below 100%, but the returns on this can be diminishing. Change this as a last resort.
- Other settings will function about as you’d expect- start with them at Very Low as a baseline, then start bumping them up if you have good FPS.
And that’s all! We’ve provided a PUBG Power Build and a low-end performance guide if you can’t afford that. Comment below and let us know if you need any more help getting the most out of your PUBG!

