How to overclock DDR5 RAM
We take you through the steps on how to overclock RAM if you're using DDR5 memory in your machine
WePC is reader-supported. When you buy through links on our site, we may earn an affiliate commission. Prices subject to change. Learn more
If you’ve bought your DDR5 RAM, your DDR5 motherboard, and have the DDR5 compatible CPU to run it, you may be interested in how to overclock DDR5 RAM so as to get the most out of your new system. Overclocking is something the PC community has been doing for well over a decade now and it’s easy to see the appeal: getting more performance out of the same component for the same price.
Before we start with the guide, a word of caution: overclocking your RAM or anything in your PC will most likely void its warranty. This is because pushing components outside of their normal operating conditions has the potential to cause damage.
However, with that out of the way, don’t be scared! Your motherboard will dish a load of warnings before you can cause any real damage. If something is wrong your motherboard will tell you, correct the problem itself or refuse to boot to prevent damage.
Ways to overclock DDR5 RAM
This guide will offer you two solutions to get the best performance out of your DDR5 RAM, depending on how deep you want to go:
- First, we will show you how to enable XMP just to get the best base performance out of your RAM. XMP stands for Extreme Memory Profile and it’s required to obtain your RAM’s standard speed if that speed exceeds 4800MHz. For example, our kit’s base speed is 5200MHz so we will need to enable XMP to actually achieve this.
- Second, we will show you how to overclock your DDR5 memory through manual overclocking. This is a more time-consuming process that requires a lot of trial and error, but it’s worth it in the end – at the very least, you’ll have learned a new skill.
How to enable XMP to get rated module speeds
There are two routes to go about doing this in the BIOS: the ‘EzMode’ or ‘Advanced Mode’. In terms of outcomes, they achieve the same thing, but some people like to see all the settings changes step by step so they can understand exactly what’s going on.
If you change your mind, you can switch between the EzMode and Advanced Modes in the BIOS by pressing the F7 key, or by clicking where it is displayed in the bottom right of the screen. Before doing this, however, you must do the following:
- Turn on your computer and as it’s loading up, repeatedly click the delete key like your life depends on it to make sure you don’t miss the POST sequence. We’ve also put together how to enter BIOS (on any PC) if you need help.
- If you miss the POST sequence, Windows will load up as normal and you’ll have to restart your computer and try again. If you don’t, you should be given the option to load your BIOS screen, or load into it automatically.
- BIOS screens differ between motherboard model and brand. The motherboard we’re using is the ROG Maximus Hero z690, so our BIOS layout may look slightly different from yours, but all of the steps are fundamentally the same. Just be advised that some settings may be located under different menus or sub-menus.
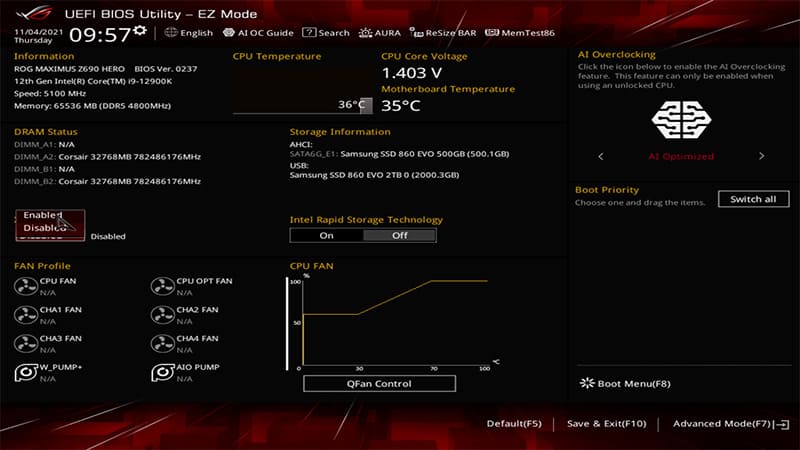
How to enable XMP – EzMode
Step
Enable XMP (EZMode)
EzMode is, well, a lot easier (the clue is in the name, unless you pronounce ‘z’ as zed). Simply:
- Look to the left of the BIOS screen where there is a handy drop-down box labeled ‘XMP’.
- Click on the box where it displays ‘disable and enable XMP’ and select the enable option.
- Done. It’s that simple. You have now enabled XMP and your RAM should be running at its intended speed.
How to enable XMP – Advanced Mode
Step
Enable XMP (Advanced Mode) – Extreme Tweaker
- To open Advanced Mode press the F7 key or select it with your mouse in the bottom right of the screen.
- Select ‘Extreme Tweaker’ from the top line of the options that should now appear across the top of the BIOS screen.
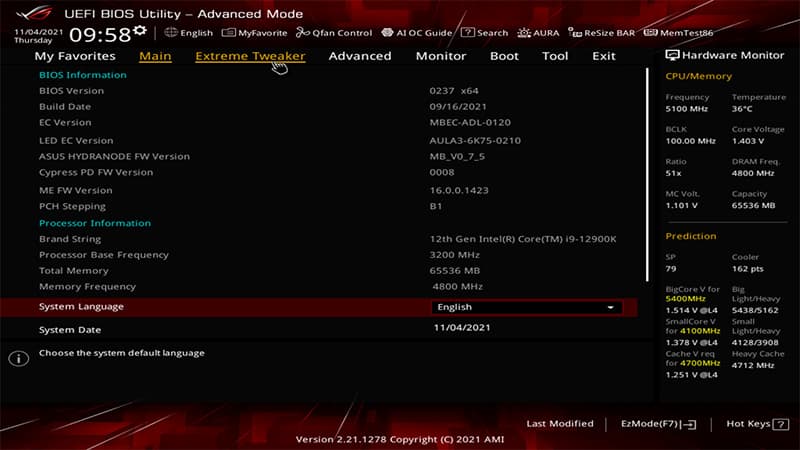
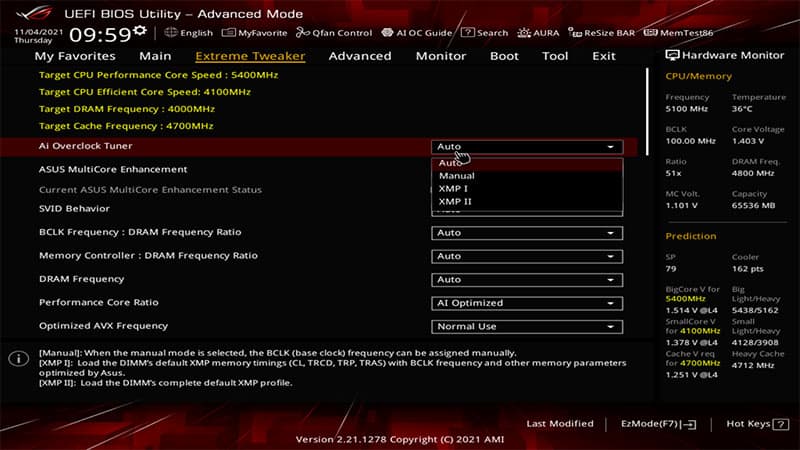
Step
Change Ai Overclock Tuner to XMP 1
- Scroll down to where ‘Ai Overclock Tuner’ is located.
- Open the drop-down box and click on XMP 1 from the list.
- Congratulations! You have now enabled XMP through the Advanced settings.
Manual overclocking
To get even more out of your DDR5 you’re going to need to actually disable XMP (rather than enable it as above) and utilize the manual overclock settings. This once again takes place within the Advanced Mode menu. Simply follow the steps below.
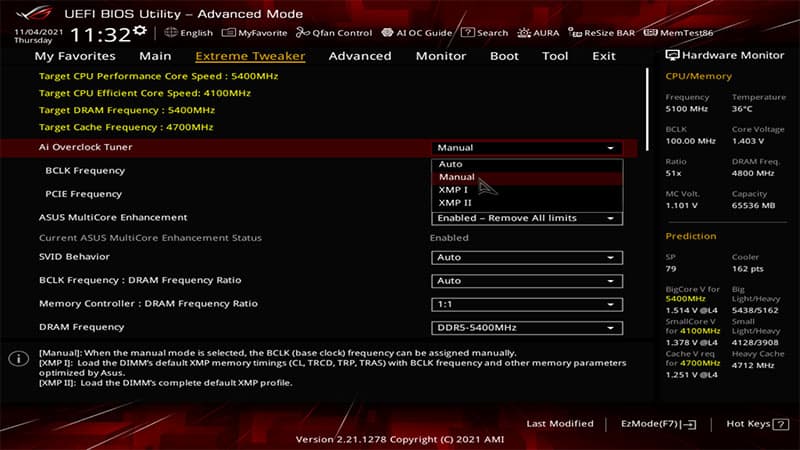
Step
Disable XMP and move into manual mode
- Follow the XMP Advanced Mode steps above but instead of selecting XMP 1, select Manual from the drop-down menu next to Ai Overclock Tuner.
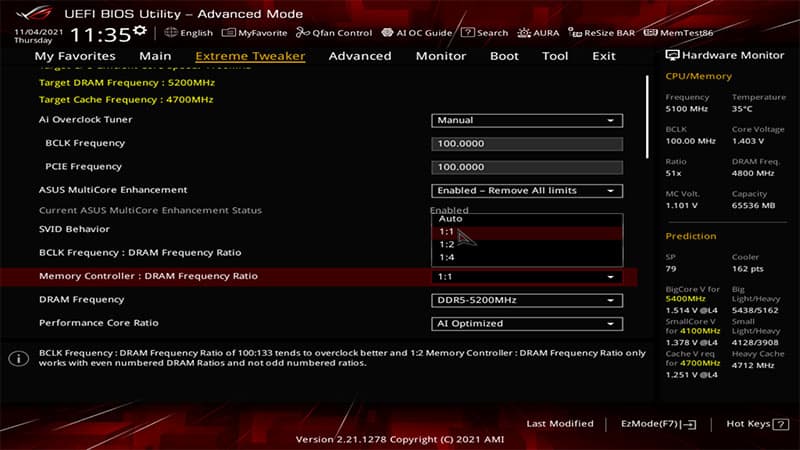
Step
Set DRAM frequency to 1:1
- Scroll down to Memory Controller : DRAM Frequency Ratio and select 1 : 1 from the dropdown menu. This will make sure you can achieve every DRAM Frequency increment.
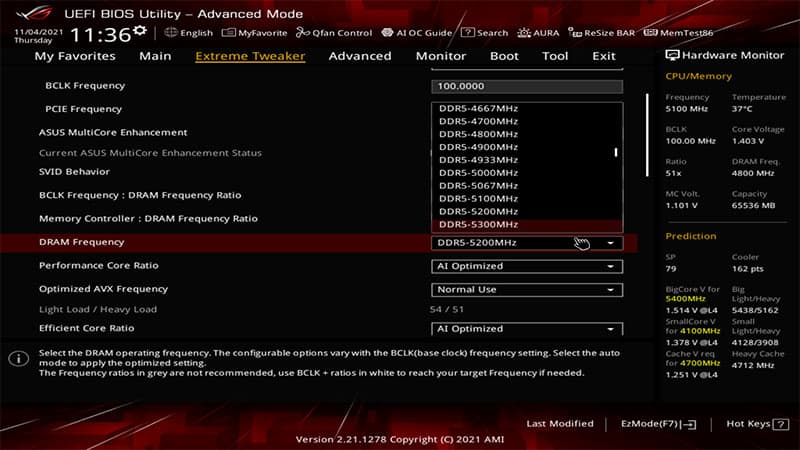
Step
Increase the DRAM Frequency
- Scroll down to DRAM Frequency and try increasing the smallest frequency increment you can. Don’t get too carried away just yet.
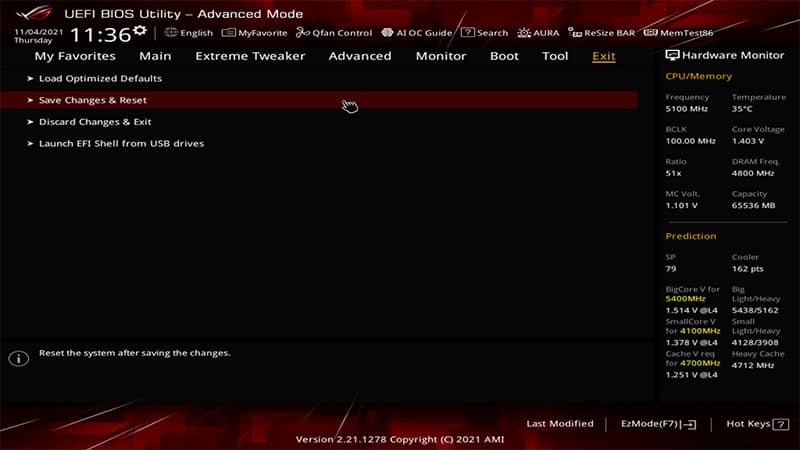
Step
Reboot your PC
- Select Save and Exit from the Exit menu and see if your PC will boot.
- If the computer boots successfully, repeat the process again and see how far you can push the DRAM frequency with your current voltage before your PC won’t boot properly. For a small 100Mhz step you may not need to do this.
Step
Adjust the voltages
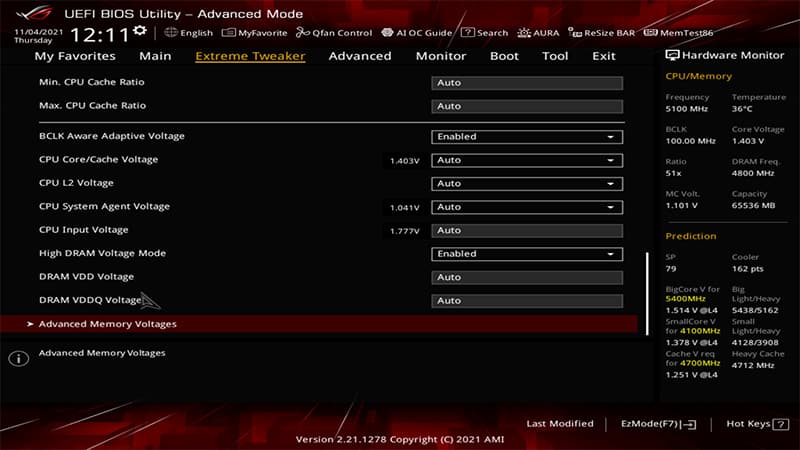
If you wish to push your DDR5 RAM further you’ll have to adjust the Voltages and this is no simple process; it’s more of a mix between fine art, and trial and error. There are a few things you need to understand that differ with DDR5 memory compared to overclocking DDR4 RAM:
- DRAM voltage is gone (at least on this ASUS Maximus Hero z690 motherboard anyway).
- DDR5 introduces on-module power management. Each memory stick has its own power management IC (PMIS) responsible for reducing 5v input from the motherboard to the required DIMM voltages.
- All available PMIC regulation parameters are available under ‘Ai Tweaker\Advanced Memory Voltages’ but the two main rails of interest are DRAM VDD and DRAM VDDQ, as these are the only helpful settings for overclocking. The recommended voltage of each is 1.25v so try not to exceed that if you can.
- Each stick of RAM is different and requires different voltages depending on the performance. Some are rated for much higher voltages than others, but as a general rule, we’d never suggest going over 1.5V.
- The recommended voltage baselines for different brands of memory modules are as follows: 1.25v VDD and VDDQ for Hynix, 1.25 VDD 1.35 VDDQ for Micron, 1.35 VDD 1.35 VDD for Samsung.
- Leave all the rest of the settings on auto.
Step
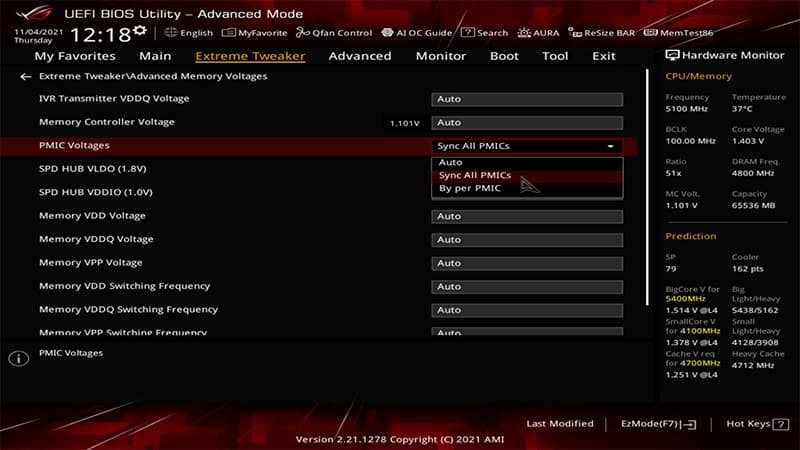
Advanced Memory Voltages
- With the above summary in Step 5 in mind, scroll all the way down to the Advanced Memory Voltages options. Click on it to open a sub-menu with various options.
Step
PMIC Voltages
- Make sure the ‘PMIC Voltages’ setting is set to ‘Sync all PMICs’.
Step
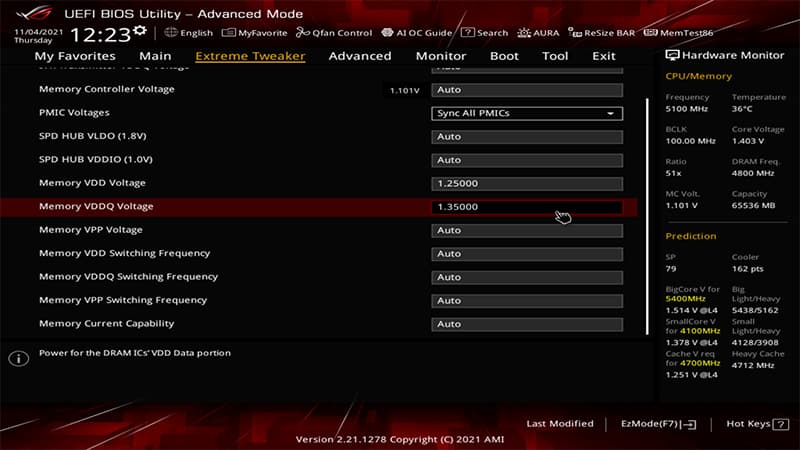
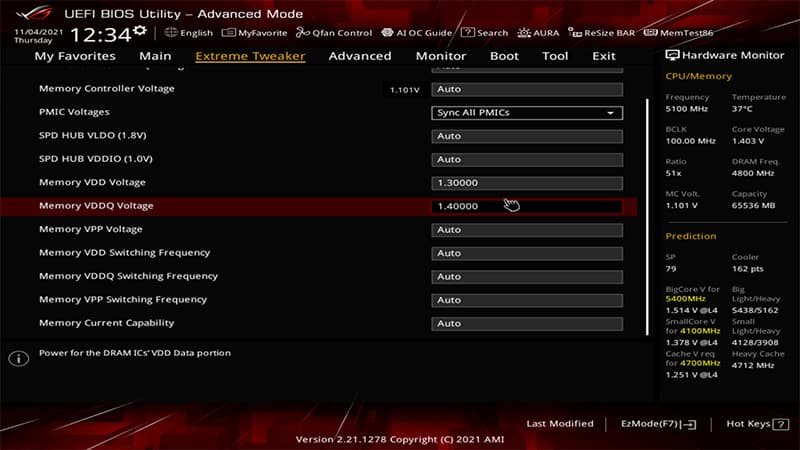
Memory VDD Voltage & Memory VDDQ Voltage
- Change the voltages under the VDD and VDDQ headings to the ones that correspond to the baselines in Step 6 for the manufacturer of your memory.
- Since our module manufacturer is Micron we will be starting at 1.25 VDD and 1.35 VDDQ.
- Click Save and Exit to save the changes.
Step
Repeat, repeat, repeat
Now you’ve got the base voltage set, here comes the ‘fun’ part and the real meat of the overclocking process.
- You must repeat Steps 3 – 8 as you see fit: dialing up the DRAM frequency slowly (as in Step 3), booting your computer to test the new settings (as in Step 4), and increasing the voltage by 0.05 on both VDD and VDDQ when you meet any instability (as in Step 8).
- As a good rule of thumb, don’t exceed your RAM’s rated voltage, which is usually 1.5v but could be lower depending on what RAM you have.
- Eventually, you will start to get diminishing returns, and hit a ceiling beyond which you can’t get any more performance out of the overclock. This is obviously when you should stop. There is some degree of trial and error, a dynamic volatile symphony between voltage and clock speed. There is no exact science to overclocking RAM – all we can do is give you the basic methodology and let you experiment.
- A good way to test how stable your overclock is, is to run a stress test once you’ve booted into Windows. This specific kind of test will force your PC to ramp up to the max and will quickly show any issues with stability.
- Et voilà! You now know everything you need to know to go forth and overclock your DDR5 RAM. Enjoy!
Final word
We hope this guide on how to overclock DDR5 RAM has been useful. Do feel free to give us some feedback in the comments section below and check out some of our other how to guides for all your software, hardware, and gaming conundrums. If you’ve yet to buy yourself the hardware necessary for this guide, also check out our Where to buy DDR5 and the Best DDR5 motherboard guides.