How to update your BIOS for Ryzen 5000 series CPUs – AMD BIOS update
We explain how to get your motherboard 5000 series ready with the latest BIOS update
WePC is reader-supported. When you buy through links on our site, we may earn an affiliate commission. Prices subject to change. Learn more
Wondering how to update your BIOS for the Ryzen 5000 series? You’re in the right place. The release of AMD’s Ryzen 5000 series CPU lineup promised what AMD classed as “Intel-beating” performance. We performed a benchmarking comparison between the Ryzen and Intel 10th Gen, the result of which was massively encouraging for AMD fans. AMD has also kept its word in terms of compatibility and chipsets, making the Zen 3 processor family fully compatible with 400/500 series AM4 motherboards.
That being said, you will need to perform a BIOS update for both 400/500 series motherboards to work with the processor family. Luckily, the process isn’t that difficult. In the following article, we’ll be walking you through how to update your BIOS for Ryzen 5000 series CPUs. We’ll be looking at the hardware you’ll need and what is and isn’t compatible. Yes, it has been a while since the 5000 series first arrived – but some of you may still be working with some outdated hardware.
If you’re looking to purchase a Ryzen 5000 series CPU, check out some of our top picks below. You can also see our best Ryzen 5000 series CPU article if you need more info on the CPUs themselves.

How to update your BIOS for Ryzen 5000 – Video
Items needed for an AMD Ryzen 5000 Series BIOS update
Before we get started, it’s worth quickly outlining some of the items you’ll need for updating your Ryzen 5000 series BIOS. The following items will be essential to perform a clean, stress-free BIOS update:
- Internet Connection: The first thing you’ll need is an internet connection. Whilst this probably seems obvious, it’s still worth pointing out for some beginners. Before starting the update, you’ll have to physically download the BIOS update from the motherboard manufacturer’s website.
- USB Flash Drive: Once you have completed downloading the BIOS, you’ll have to store it on a flash drive.
- 400/500 series compatible Motherboard: You’ll need to use a compatible 400/500 series motherboard to get the BIOS updated. If you try slotting a new 5000 series CPU into an old board, the system won’t post.
How to update BIOS for Ryzen 5000 Series CPUs
It’s time to go over the method of actually updating the BIOS. Remember, always have a secondary, fully compatible CPU at hand in case an unexpected problem occurs during the update process. If your motherboard has a BIOS flashing option, you can use that instead of a compatible CPU to update your BIOS. This, however, is only available on higher-end motherboards.
With that, let’s jump into the process.
Step
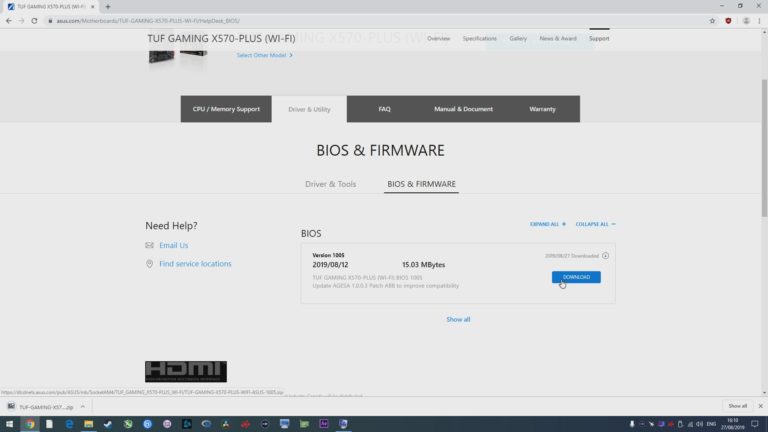
Find and download the Latest BIOS Version
The first thing you need to do is find the latest version of your motherboard’s BIOS. This is a fairly simple process, requiring you to access the manufacturer website, finding your motherboard, and then searching for the BIOS section – usually found under SUPPORT.
Inside support, you should see a section that clearly displays the latest BIOS version for that particular motherboard. Download it.
Step
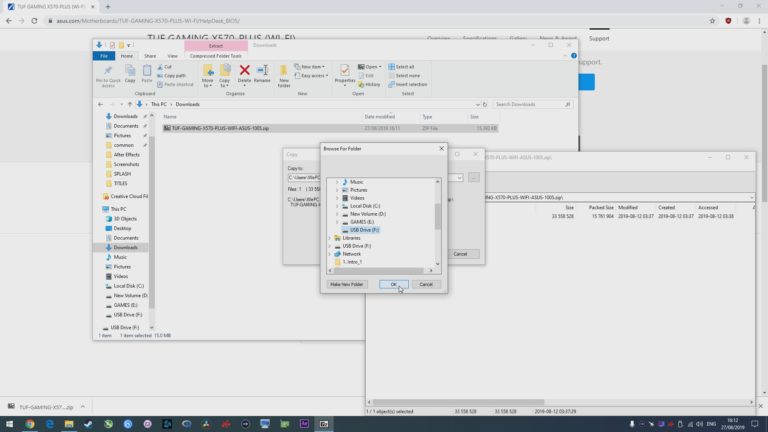
Unzip and copy the BIOS to a Flash Drive
Once you have downloaded the latest BIOS version, the next step is to unzip the file and copy it to your flash drive. To do this, simply find the file in your downloads/desktop folder, right-click and select unzip. When prompted, select the flash drive as the location for the unzipped files.
Step
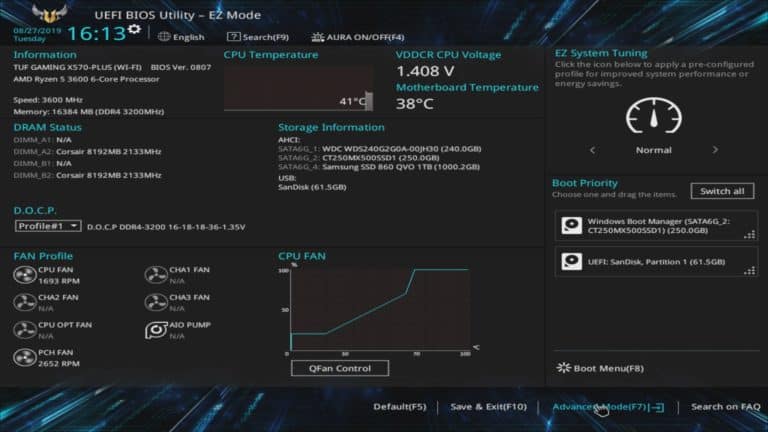
Reboot your PC and enter the BIOS
Once you have copied the BIOS update file to your flash drive, simply restart your PC and enter the BIOS. Before you do so, don’t forget to insert the flash drive into the recommended slot. This is usually at the rear of the motherboard.
You can do this by pressing ‘DEL’ on startup. Alternatively, if this doesn’t work, press ‘F2’ or look up the BIOS button in your motherboard manual.
Step
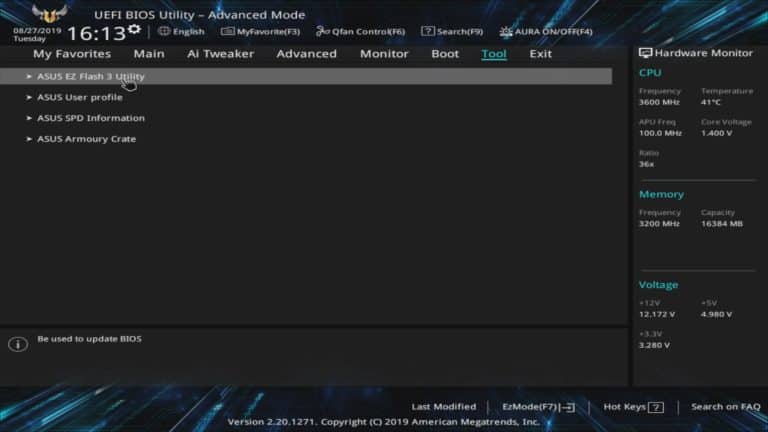
Launch the BIOS Firmware Update Tool / Flashing Tool
Find the BIOS firmware/flashing tool in the BIOS menu. For our particular board, we had to enter the advanced tools section by pressing F7. Inside advanced, you’ll find an option to launch a flash update. On ASUS boards, this section is called the ASUS EZ Flash 3 Utility.
Step
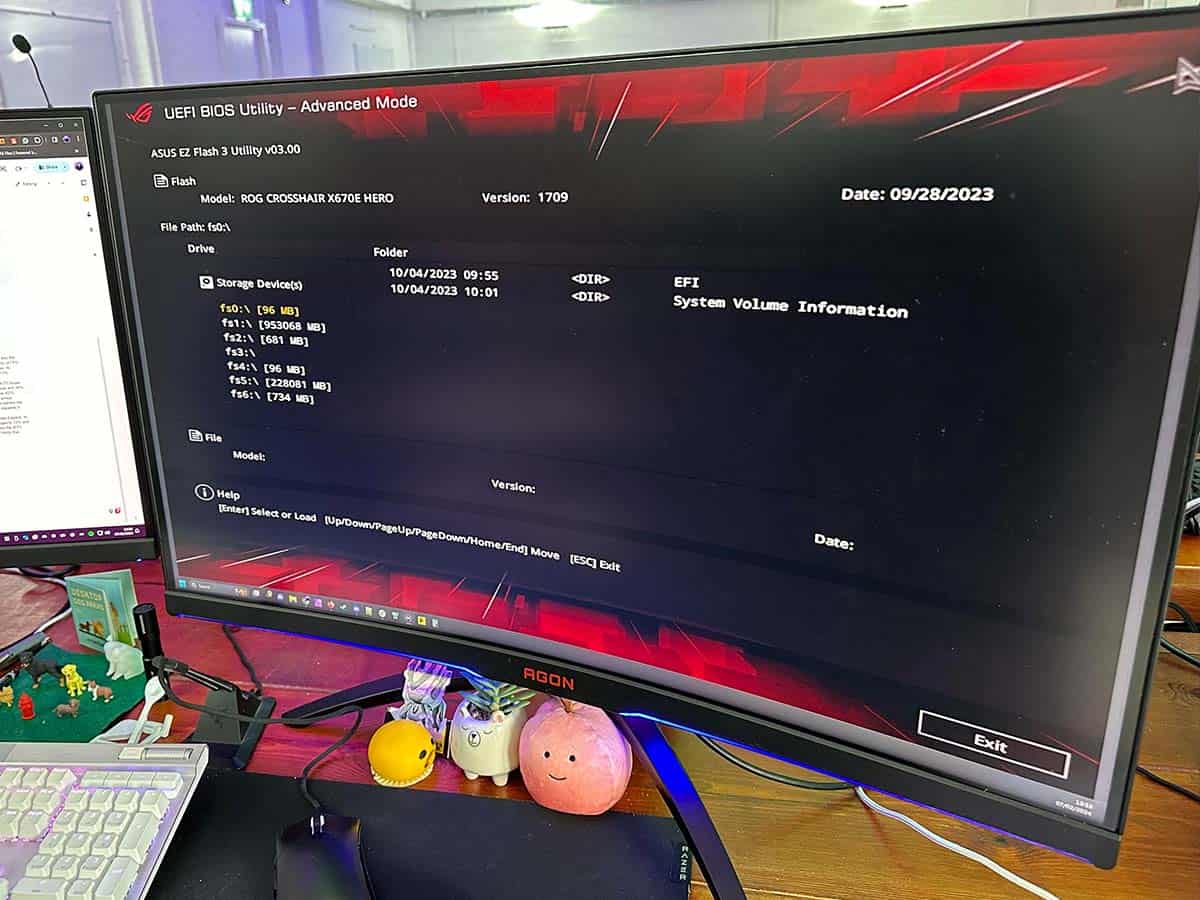
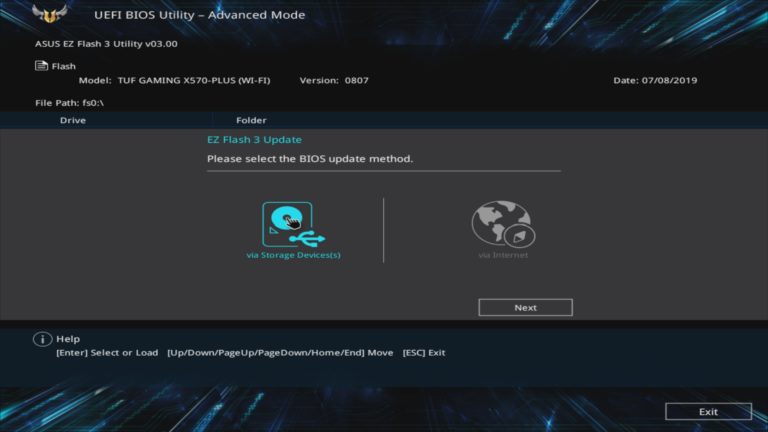
Select the Flash drive to launch update
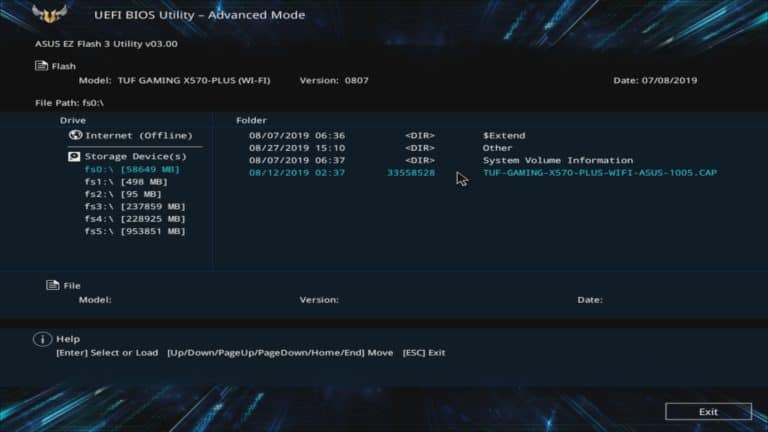
Inside the flashing tool is, for all intents and purposes, the start of the BIOS update process (within the BIOS menu). In here, you must first select what drive the BIOS will update from – in this case, it’s the flash drive/ storage drive.
Once you’ve selected the correct drive, simply select the BIOS update file by double-clicking it. You will be asked whether or not you want to load this file – simply select yes to start the update.
Step
Finalize the BIOS update
Once complete, the BIOS will restart your system with the update loaded. Once restarted, your system may ask you to enter into the BIOS once again. If this is the case, simply re-enter the BIOS and load optimized defaults and restart.
How to update BIOS using BIOS flash utility
Here we will outline how to use the BIOS flash utility if your motherboard has one. Find a list of motherboards that carry the BIOS flash utility in the FAQ section below. This method is much easier but requires some file renaming. The area this method shines is in the fact that it does not require a separate CPU to perform the update.
Step 1
Download the latest BIOS version
The first thing you need to do is the same as the other method. Go to your motherboard manufacturers website and download the latest BIOS version.
Step
Load the BIOS file onto a USB flash Drive and rename it
This step is also similar to the previous method, once you download and extract the BIOS file, you need to add it to the ROOT directory of your USB flash drive. The drive has to be completely empty besides the bios file, and formatted in the FAT32 file format.
The difference between this method and manually flashing the BIOS, is that you have to rename the BIOS file, because the BIOS chip on the motherboard is hard coded to only accept a specific file and format. It sounds more complex than it is.
Sometimes, when you download a BIOS file, you get a .bat file named something like “BIOSRenamer”, it depends on the manufacturer. This file will automatically rename the BIOS when ran to the name that will be accepted by the BIOS flash process. (this BIOSRenamer file usually comes with BIOS files that belong to motherboards that have a flash utility).
Drag the BIOS file and the “BIOSRenamer” to the ROOT directory of the USB flash drive and RUN the “BIOSRenamer”. This should change the name and file extension of the BIOS file.

Make sure you delete the BIOSRenamer off the USB after you have finished with it.
Sometimes you will be expected to rename the file yourself, as the BIOS will not come with an automatic re-namer. In this case, the name you need to change the BIOS file to should be in your motherboard manual under the BIOS section.
Step
Plug the USB drive into the USB port labelled BIOS in the back of the motherboard
Next, you need to plug the USB drive containing the BIOS file on the back of the motherboard, but you can’t just plug it into any USB slot.
You have to place the USB into the slot labelled BIOS. (It’s usually outlined by a solid square). This is the USB port that the BIOS chip and updater reads from when the BIOS flash process is initiated.

Step
All that’s left to do is press and hold the BIOS flash button for around 5 seconds, the button should flash at a constant rate until the BIOS update is complete. The BIOS should take around 5 or 10 minutes to flash.
The motherboard pictured is not an X570 motherboard, but it serves as an example of what to look for when searching for the BIOS flash button.

The PC does not have to be turned on to flash the BIOS, it just needs to be connected to power and the PSU needs to be turned on.
The system may or may not boot and reset during this process, it depends on the motherboard.
Don’t remove the USB drive until the BIOS update has completely finished you’ll know it has when the light stops flashing.
If the BIOS file is incorrect, the BIOS light will only flash for a couple of seconds and then return to normal. The BIOS update will not initiate.
What does a BIOS do?
A BIOS (Basic Input/Output System) is a low-level software that acts as the interface between the operating system and the hardware components of a computer. It controls the system boot process, initializes the hardware components, and provides a user-friendly interface for configuring the system settings.
The BIOS is stored on a chip on the motherboard and is the first software to run when a computer is powered on. It performs tasks such as checking the system’s memory, identifying and testing connected hardware components, and setting up the boot process.
The BIOS also provides a setup utility for configuring the system’s hardware and software options, including the system clock, hard drive, and keyboard settings. The BIOS plays a critical role in the boot process and the proper functioning of a computer, and its firmware is often updated by the manufacturer to add new features or resolve compatibility issues.
Why is a BIOS update important?
A BIOS (Basic Input/Output System) update is important on the AMD platform for several reasons:
- Bug fixes and security updates: A BIOS update can address known bugs and vulnerabilities in the system, ensuring that the platform is stable and secure.
- Improved system performance: A BIOS update can include optimizations and enhancements to the system’s performance, such as support for new memory or storage technologies, or improved power management.
- Support for new hardware: As new hardware is released, a BIOS update can add support for it. For example, a new BIOS update may support a new CPU microarchitecture or newer memory standards.
- Compatibility: A BIOS update can also improve compatibility between different components in the system, such as the CPU, memory, and storage.
- Overclocking: For enthusiasts, a BIOS update can also bring support for overclocking and other features to extract more performance from the system.
It is important to note that before proceeding with a BIOS update, it’s best to check the official website of the motherboard manufacturer for instructions and compatibility, as a failed BIOS update can cause serious issues on the system.
It’s also recommended to have a backup of your important data before proceeding with the update, in case something goes wrong.
FAQs
Do I need to do a Ryzen 5 5600X BIOS update?
If you’re upgrading to any Ryzen 5000 series CPU, including the popular 5600X, you may have to do a BIOS update. This is the case if you using a 400/500 series AM4 motherboard.
Is a BIOS update for Ryzen 7 5800X necessary?
The 5800X is part of the 5000 series, so a BIOS update may be necessary depending on your motherboard. Any 400/500 series AM4 motherboard should be updated to the latest BIOS version if you’re looking to install this processor.
Final word
So, there you have it, our easy-to-follow guide on how to update your BIOS for Ryzen 5000 series CPUs. If you’re buying a motherboard for Ryzen 5000 these days, then you may not need to update as these CPUs have been out for a few years now. CPU compatibility on the motherboard is usually updated for you at the factory. However, anyone who’s been using the same AM4 board for a long time and is moving on up to the Ryzen 5000 series may have to consider it.
You are now armed with all the knowledge you need to update your motherboard BIOS, and thankfully, the fundamentals are the same no matter what motherboard you’re updating the BIOS for. So, should you be faced with needing to update a motherboard BIOS again, it should be no problem. If you do struggle though, we’ll always be here to help!