How to screenshot on laptop devices
An exhaustive list of the different ways you can screenshot on a Windows laptop
WePC is reader-supported. When you buy through links on our site, we may earn an affiliate commission. Prices subject to change. Learn more
This guide is all about showing you how to screenshot on laptop devices, specifically Windows laptops. There are a bunch of different ways this can be done, so we’ll be covering every single one – especially as different people have different preferences when it comes to shortcuts and hotkeys. All these techniques work regardless of the specs or price of your laptop.
We will be covering the tools available for free that come installed with Windows, as well as third-party programs (some free, some not) which can give you extra screenshot functionality. This is relevant to newer Windows 11 laptops, too.
How to screenshot on laptop with Print Screen

Simply pressing the Print Screen key on your laptop keyboard (often labelled as PrtScn and located on the top right) is one of the easiest ways to screenshot on laptop devices, though there are several variances on how you can do this depending on what you want to achieve.
PrtScn
- Pressing the Print Screen / PrtScn key will screenshot your entire screen.
- The image will then be automatically saved to your Clipboard (which saves the last five things you have copied and can be accessed by pressing the Search/Everything key + V ).
- Next simply open up an image editing program, or anything else that will let you copy images into it, press Ctrl + V to paste, and save the image in your chosen format (JPEG/PNG/etc.).
Windows key + PrtScn
- As an alternative to the above you can also press the Windows key + PrtScn to copy and then automatically save the screenshot.
- Upon successfully screenshotting, your display will dim, and the files will be saved in the following folder:
Pictures > Screenshots.
Alt + PrtScn
- Pressing Alt + PrtScn will screenshot only the active Window you have open on your display.
- As above, you will then need to paste with Ctrl + V in a suitable program to save the image.
How to screenshot on laptop with Snip & Sketch

The Snip & Sketch tool is the latest inbuilt application for Windows that lets you screen shot on laptop devices (as well as on Windows desktop computers).
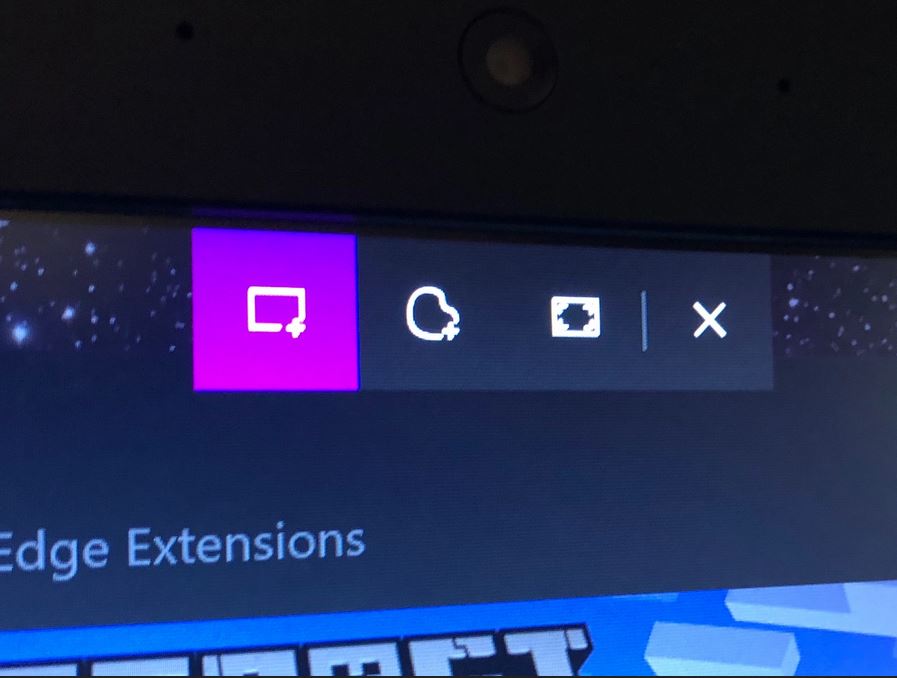
- Simply pressing Windows key + Shift + S will cause a menu bar to appear on the top border of your display (as can be seen in the image above).
- From left to right, the four screenshot options in the Snip & Sketch menu are:
Rectangular (a re-sizable screenshot box in the shape of a rectangle)
Free-form (lets you draw your own capture shape free-hand)
Window (select an open Window you wish to screenshot)
Full-screen (screenshots the entire screen)
How to screenshot on laptop with Snipping Tool

The Snipping Tool may be gradually being phased out in favour of Snip & Sketch, but you can still use this application in Windows 11, 10 and all previous iterations of the Windows OS.
- Simply search for Snipping Tool in your search bar and open the program (we would advise right clicking and pinning it to your toolbar for easy access).
- You can use the Mode menu to switch between the same Free-form, Rectangular, Window, and Full-screen snips as in the Snip & Sketch tool.
- Click New to take the screenshot, after which it will appear in a new window which you can modify or save as and where you like.
How to screenshot on laptop with Game Bar

The Game Bar / Xbox Game Bar / Game overlay can be used in the middle of gameplay or when using any other program to both take screenshots and to record video.
- To make sure it is activated, search ‘Game Bar settings’ or ‘Game Bar controller settings’, select the option that appears and make sure the top slider is turned to On.
- Press Windows key + G to pen the Game Bar. The overlay should now appear.
- Click the camera icon in the top left of your screen (as pictured) to take a screenshot of your laptop display.
- All still screenshots as well as video captures will be saved in Videos > Captures.
How to screenshot on Microsoft Surface
Whilst we’re here, if you’re running on a Microsoft Surface machine, rather than a full laptop, use the below shortcut to take a screenshot. This will then be saved in Pictures > Screenshots.
- For most newer Surface devices: Power button + Volume Up button.
- For Surface 3 devices or earlier: Windows Logo + Volume Down button.
Alternative apps for screenshotting on Windows
Besides the above methods from screenshotting on a laptop with the applications included in Windows, there are also third-party applications which also give you extra functionality.
Some of the best of these are:
- Greenshot: a free piece of software that lets you edit and customize screenshots. Also lets you capture a full web page that requires scrolling to navigate, in one go!
- Lightshot: another free application that replaces Print Screen on your laptop, giving more editing functionality and making it easier to share what you’ve captured on social media.
- Snagit: a pay-for application (costs around $50) that enables you to make animated GIFs from what you capture, as well as more easily take full page screenshots.
Other laptop guides
- How to right click on a laptop
- How to connect AirPods to laptop devices
- How to connect AirPods to Dell laptop models
- How to connect AirPods to HP laptop models
- How to connect AirPods to Lenovo laptop devices
Final Word
This has been our step-by-step guide on how to screenshot on laptop devices. We hope you’ve got all the information you need. Be sure to have a look at our other laptop how-to guides for other insights on using your portable computer.