How To Update GIGABYTE BIOS
We take you through the required steps to update a Gigabyte Motherboard BIOS
Share this article...
WePC is reader-supported. When you buy through links on our site, we may earn an affiliate commission. Prices subject to change. Learn more
The computational universe was sparked into a motherboard BIOS frenzy when the new Ryzen 3rd Gen CPUs hit shelves.
Mainly because no one wanted to splash out on an expensive X570 when they could simply update their last-gen 300/400 series board instead.
I know what I’d have done!
Forums and websites were flooded with requests on how to update their BIOS to ensure compatibility with the new, affordable chips. For that reason, we’ve decided to make this article on how to update your BIOS.
This article is going to show you exactly how to perform a GIGABYTE BIOS update in full.
Let’s jump into it.
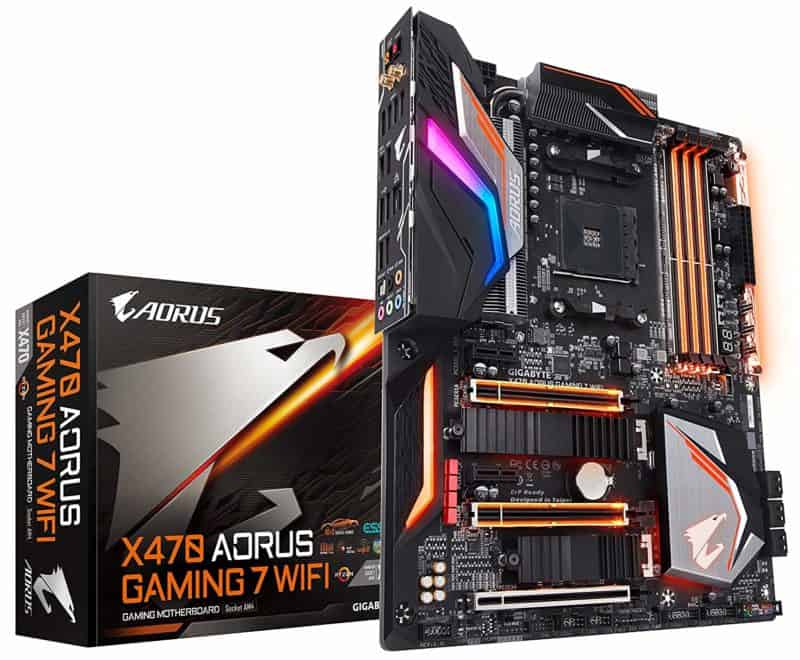
GIGABYTE X470 AORUS ULTRA GAMING
GIGABYTE X470 AORUS ULTRA GAMING
Form Factor
ATX
Overclock Support
Yes
Socket
AM4
Chipset
X470
The motherboard we’re updating in this how-to guide is the X470 AORUS ULTRA GAMING from GIGABYTE. It’s had a hard time since the new Ryzen 3rd gen CPUs were released for its lack of BIOS flashback. We’re going to see how difficult this motherboard really is by performing several BIOS updates.
There has been a lot of speculation around whether the GIGABYTE X470 AORUS ULTRA GAMING motherboard is worth the hassle. Mainly due to the flaws many people have been experiencing with it.
Usually, a simple BIOS update is the fix.
However, with the X470 ULTRA GAMING, the answer may not be that simple.
We’re going to update the BIOS and see whether or not those issues have been resolved.
All GIGABYTE motherboards can be updated in the same way. This is not unique to the X470 ULTRA GAMING in any way.
Ryzen 5000 series BIOS updates
If you’re looking to upgrade to a Ryzen 5000 series CPU, the question on many consumers’ lips is “will I need to update my BIOS?”. Of course, the answer is yes and while AMD mentioned the end to their 400-series support, it looks as though everyone can expect a BIOS update at some time or another.
ASUS is already starting to provide BIOS updates for the AMD 500 series chipsets, with other manufacturers expected to follow suit. Unfortunately, AMD fans with 400 series chipsets will have to wait longer for further support. From what we have seen, users with X570 and B550 chipsets can expect out the box compatibility, with a small update required to ensure you get the best out of your chip.
Anyway, here’s how to update your BIOS!
How to update GIGABYTE BIOS
Before starting the update process, be aware that you will need access to an internet connection (for downloading the update) and a USB Flash drive.
Everything else will be explained in the following steps. Let’s get to it.
Step
Download the BIOS update
The first thing you need to do is download the BIOS update from the GIGABYTE manufacturer website. You need to search for your motherboard in the products section of the website, in our case the X470 AORUS ULTRA GAMING. Once you’ve found your board, open the product page for it, and navigate to the support section where the latest BIOS versions will be displayed. Click download and save to your desktop.

Step
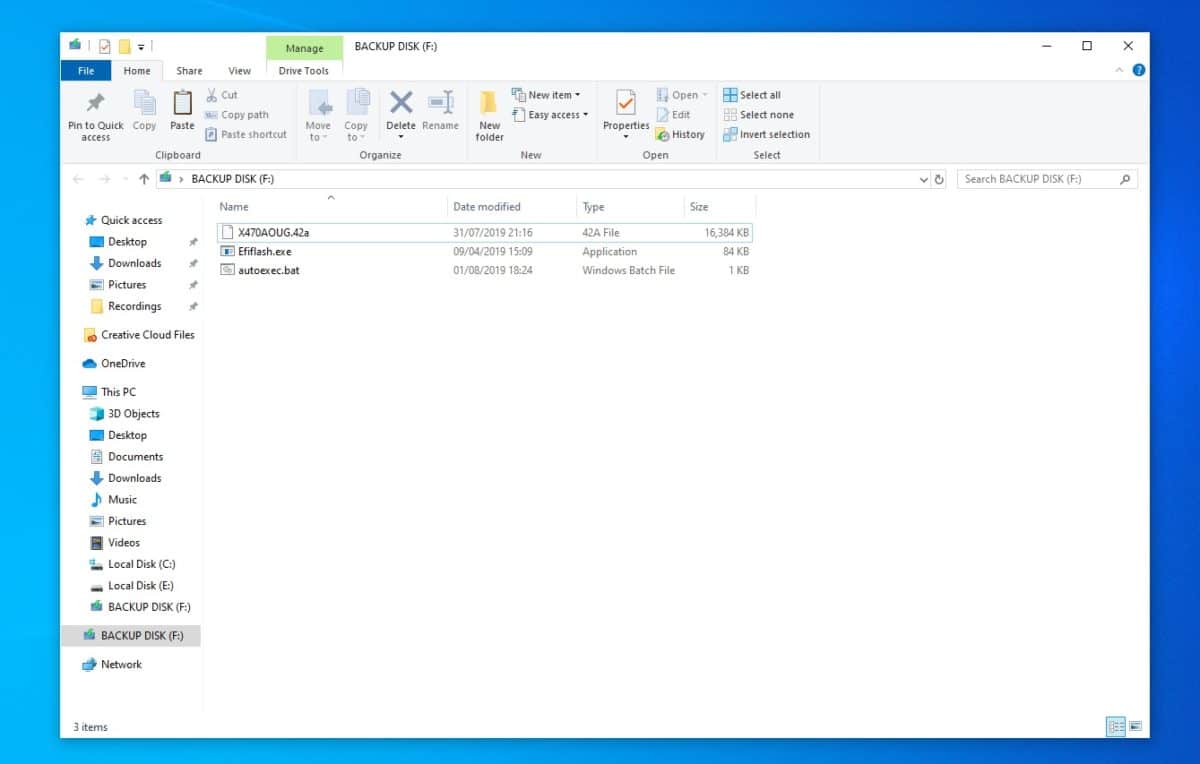
Move the BIOS update to your USB Flash Drive
You will need to extract the BIOS update files from the folder. Do this by right-clicking the file and selecting “extract here…”. You can either choose your desktop or extract the files directly onto the USB. I would choose the latter personally. If you decide to extract to desktop, you simply have to copy the files from desktop to the route of your flash drive.
Note: The USB flash drive or hard drive must use FAT32/16/12 file system.
Step
Restart PC and enter BIOS
By now you should have successfully downloaded and extracted the latest BIOS version onto your flash drive. This means you are ready to restart your computer and enter the BIOS to begin the process.
When restarting, make sure the USB is plugged in. Mash the “Del” button on your keyboard to enter the BIOS.

Step
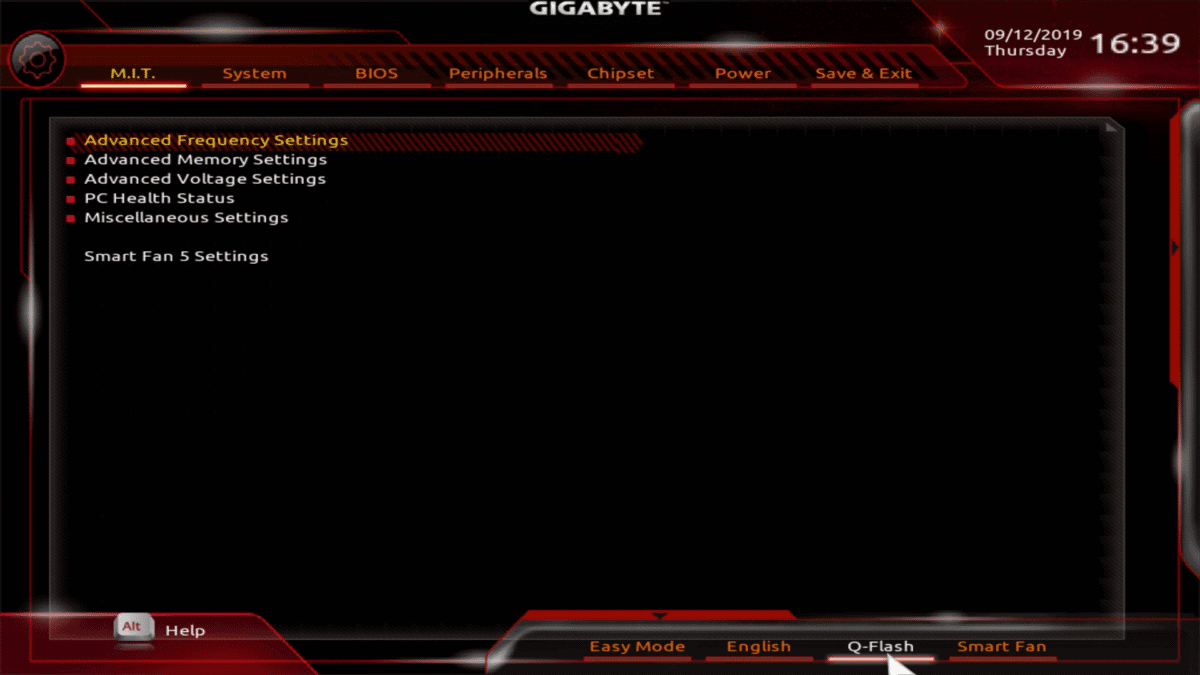
Enter the Q-Flash
Inside the BIOS, you should see a tab for Q-flash at the bottom. If you can’t see the tab, press F8 to enter the Q-flash menu.
Step
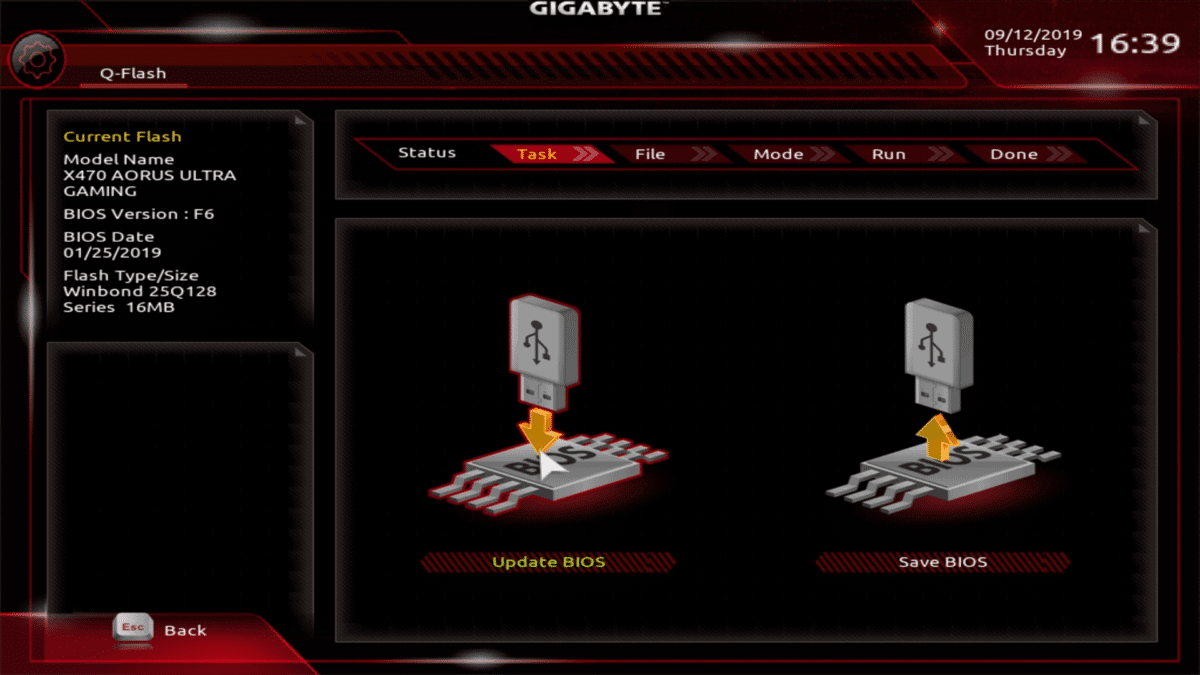
Update BIOS
Once inside the Q-Flash, you will see two options. One to “Update the BIOS” and one to “Save the BIOS“, select “Update the BIOS“.
Step
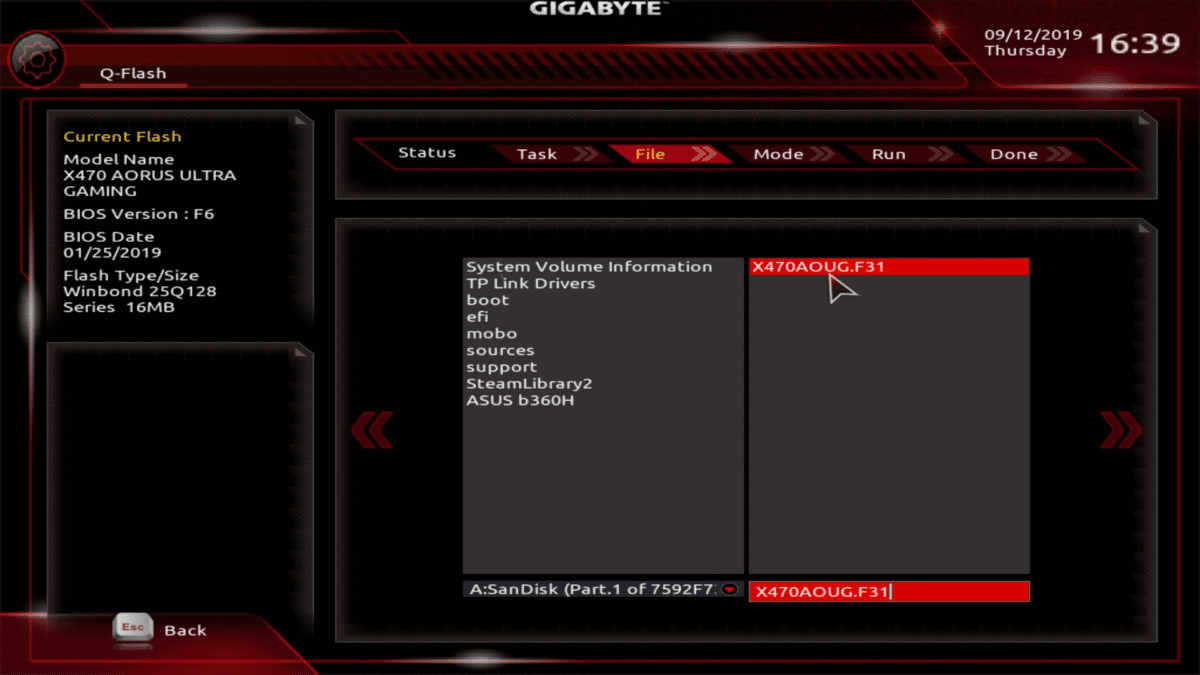
Select the BIOS update file
The next screen will ask you to select a file to run. At this stage, you want to select the BIOS update file from the list of options available.
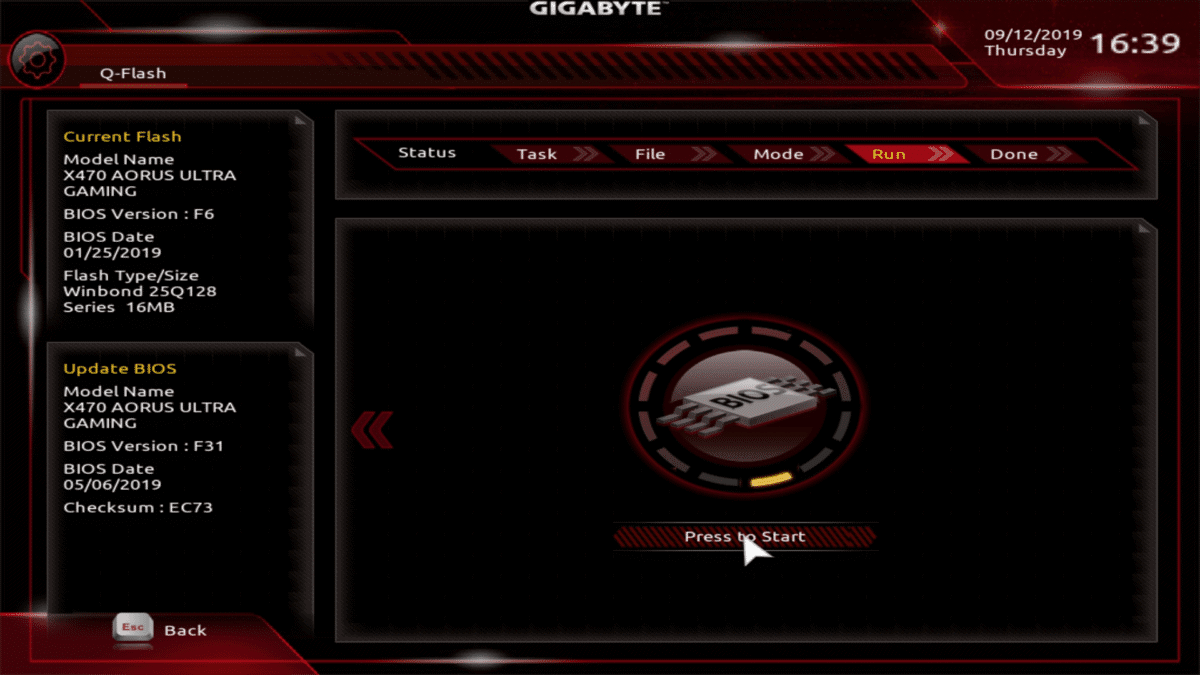
Step
Start the update
The next step is to start the BIOS update process. Simply press the “Press To Start” tab you are faced with. The BIOS update can take over 5 minutes. When the update is finished the system will automatically restart itself and load into your operating system.
Step
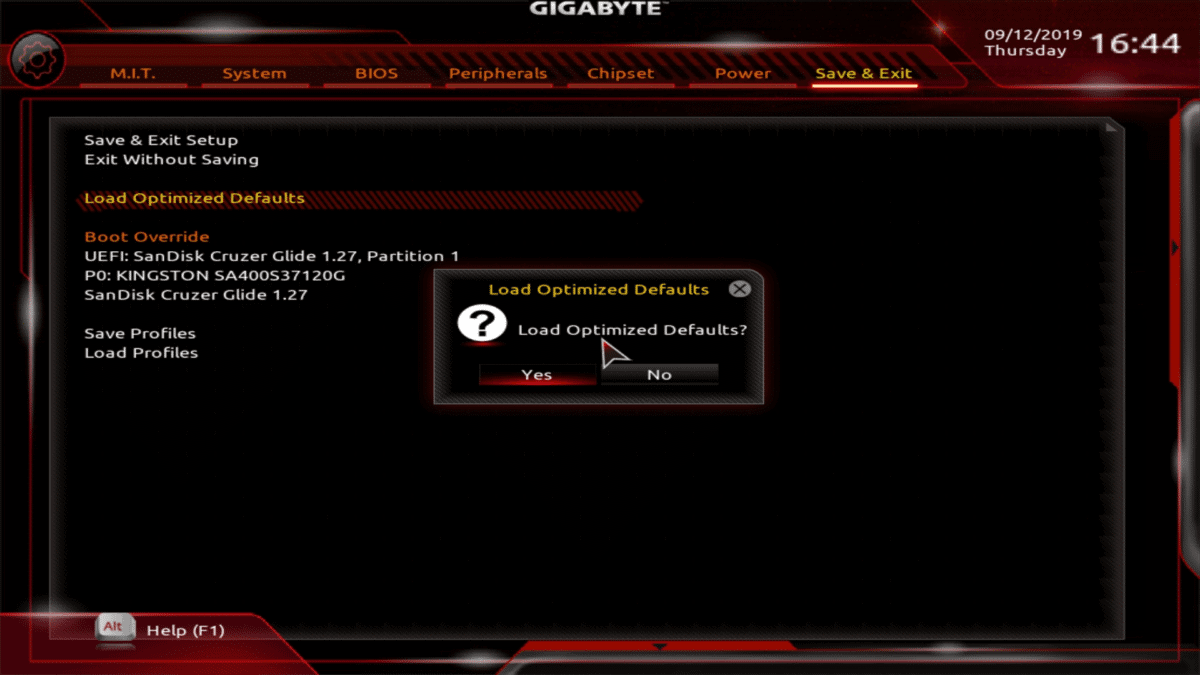
Load optimized default settings
At this stage, your BIOS has been updated. We always feel it’s good practice to load the optimized default settings at this point. Do this by re-entering the BIOS, selecting the “Save & Exit” tab and selecting the “Load optimized defaults“. It will ask you to save and restart, simply press yes.
How to update GIGABYTE BIOS FAQs
Should I update my BIOS Gigabyte?
If there is a BIOS Gigabyte update needed, then yes this should be carried out. Accepting this update will help to ensure that your software is as up-to-date as possible. This is important as it will ensure that your PC is running as smoothly as possible.
Over time, if you do not carry out updates, this can affect the PC’s performance. However, on the whole the BIOS Gigabyte does not need to be updated often. In the vast majority of cases, it is likely that you already have the latest version.
The BIOS is important because it will ensure that your operating system is running correctly, and that it is the correct system to match with the motherboard. Having updated BIOS is better for the PC, and will cause you fewer issues.
However, it is important to note that you will need to carry out this update correctly. If any corruption occurs, or if the BIOS installed incorrectly this will greatly affect the operating system of the PC, which is something you will want to avoid.
How do I check my Gigabyte BIOS version?
If you have a Gigabyte motherboard and want to check the BIOS update, this is fairly easy to do. It is useful to know how to do this to help ensure that you do not have outdated software. An outdated BIOS can slow down your PC, however, care needs to be taken when carrying out this update.
To check the BIOS you will need to carry out a system restart. Once the PC is turning on, the BIOS should flash up on the start-up screen. This is the easiest way to determine the BIOS version. However, it does disappear from the screen quite quickly. Given this, we would recommend making a note of the version.
You will be able to locate the BIOS version as it will appear as BIOS, followed by version or Revision. It is fairly easy to locate. From here you can then research whether you have the most updated version.
How do I enter BIOS Gigabyte?
To enter BIOS Gigabyte, this will need to be done while the computer is rebooting. When the system restarts, it will typically inform you of the keyboard key you need to press to access the settings. While it will be different for different devices, it is often F2.
Once you have pressed with, you will then need to press DEL, F1, F2, and the Escape buttons. This will then allow you to change it. You will need to be confident when changing these settings as you can cause issues with the PC if you enter incorrect details. You will need to know the correct input settings.
Final word
That’s everything you need to know when it comes to updating your GIGABYTE motherboard. As mentioned earlier, we tried this with the GIGABYTE X470 AORUS ULTRA GAMING motherboard. Up to now, we haven’t experienced any issues with RAM timings or CPUs.
However, we will be doing a full review using numerous hardware offerings.
If you have any questions on GIGABYTE BIOS updates, then feel free to leave a message, and we’ll get back to you as soon as we can.
Related pages
BIOS updates can be a tricky thing. For that reason, we’ve created a host of BIOS related pages to make your life that little bit easier – below are our most popular.