How to Update BIOS
Everything you need to know about updating your BIOS
WePC is reader-supported. When you buy through links on our site, we may earn an affiliate commission. Prices subject to change. Learn more
The time may have come for you to learn how to update BIOS. If you’ve never done this before, or just need something to refresh your memory, we’ll take you through the process without any complications. The motherboard BIOS can be a scary place if you aren’t too sure what you’re doing, but there’s no need to worry – we’ll show you exactly how to update your BIOS.
The BIOS is mostly seen by the basic user as an overclocking playground for the better educated in its functionality. However, the BIOS serves as a place for diagnostics, stability and control. It is the first line of diagnostics and system synergy between POST and the OS meaning it itself needs a set of instructional software to make sure everything is running smoothly. Updating this BIOS adds support for newer features, fixes bugs and much more.
READ NOW: The best AM5 motherboards available right now
So, without further ado, here’s how to easily update your Motherboard BIOS. Check out the video below or scroll further down the page for a written guide explaining all of the details.
What does the BIOS do?
The BIOS, for those who aren’t aware, is your computer’s “Basic Input/Output System”. It lives in a small chip on your motherboard and is tasked with managing the most basic of instructions which allows your computer to boot into the operating system. It doesn’t just power your PC though, it also helps protect it and makes sure everything is running efficiently.
The BIOS chip also initializes the other components upon start-up. The CPU, GPU, and motherboard all rely on the BIOS to get things up and running. A few years ago, motherboard manufacturers decided to replace the old school BIOS with a more intuitive interface which would be known as the UEFI. Most people still call it the BIOS to this day as it’s a more well-known term.
That being said, now and again, manufacturers will release a BIOS update for one of their specific motherboards. They do this to fix common bugs, make sure the motherboard is compatible with new hardware (strictly CPUs), and a bunch of other reasons that we will touch upon later.
This article is going to walk you through exactly how to update your motherboards BIOS in a simple and easy-to-understand way. We’re going to explain how to check what BIOS version you already have, how to update the BIOS in multiple ways, and BIOS updates for new builds.
Let’s jump right into it.
Other Guides
If you’re interested in learning more you can check out our other guides:
- ASUS BIOS Update
- MSI BIOS Update
- ASROCK BIOS Update
- GIGABYTE BIOS Update
BIOS flashing utilities
BIOS updates have been made incredibly easy in recent years with the inclusion of M-flash and Q-flash features. Not every motherboard has these features but they are commonly found on higher-end motherboards and more advanced chipsets.
Q-flash or M-flash (depending on your motherboard) allow the BIOS to be updated without using the CPU. The motherboard has an onboard chip that handles the bios update process, and with just the click of a button, the BIOS setup initiates automatically.
How To check your BIOS version
At this point, you’re probably asking yourself a number of different questions. One of which might be, how do I know whether my BIOS needs updating? It’s a very common question and one that can be answered with relative ease.
The easiest way is to first, check what BIOS version your motherboard is currently running. You can do this in several different ways. Below are the easiest methods.
How to check your BIOS version in the motherboard UEFI
Step
Open BIOS
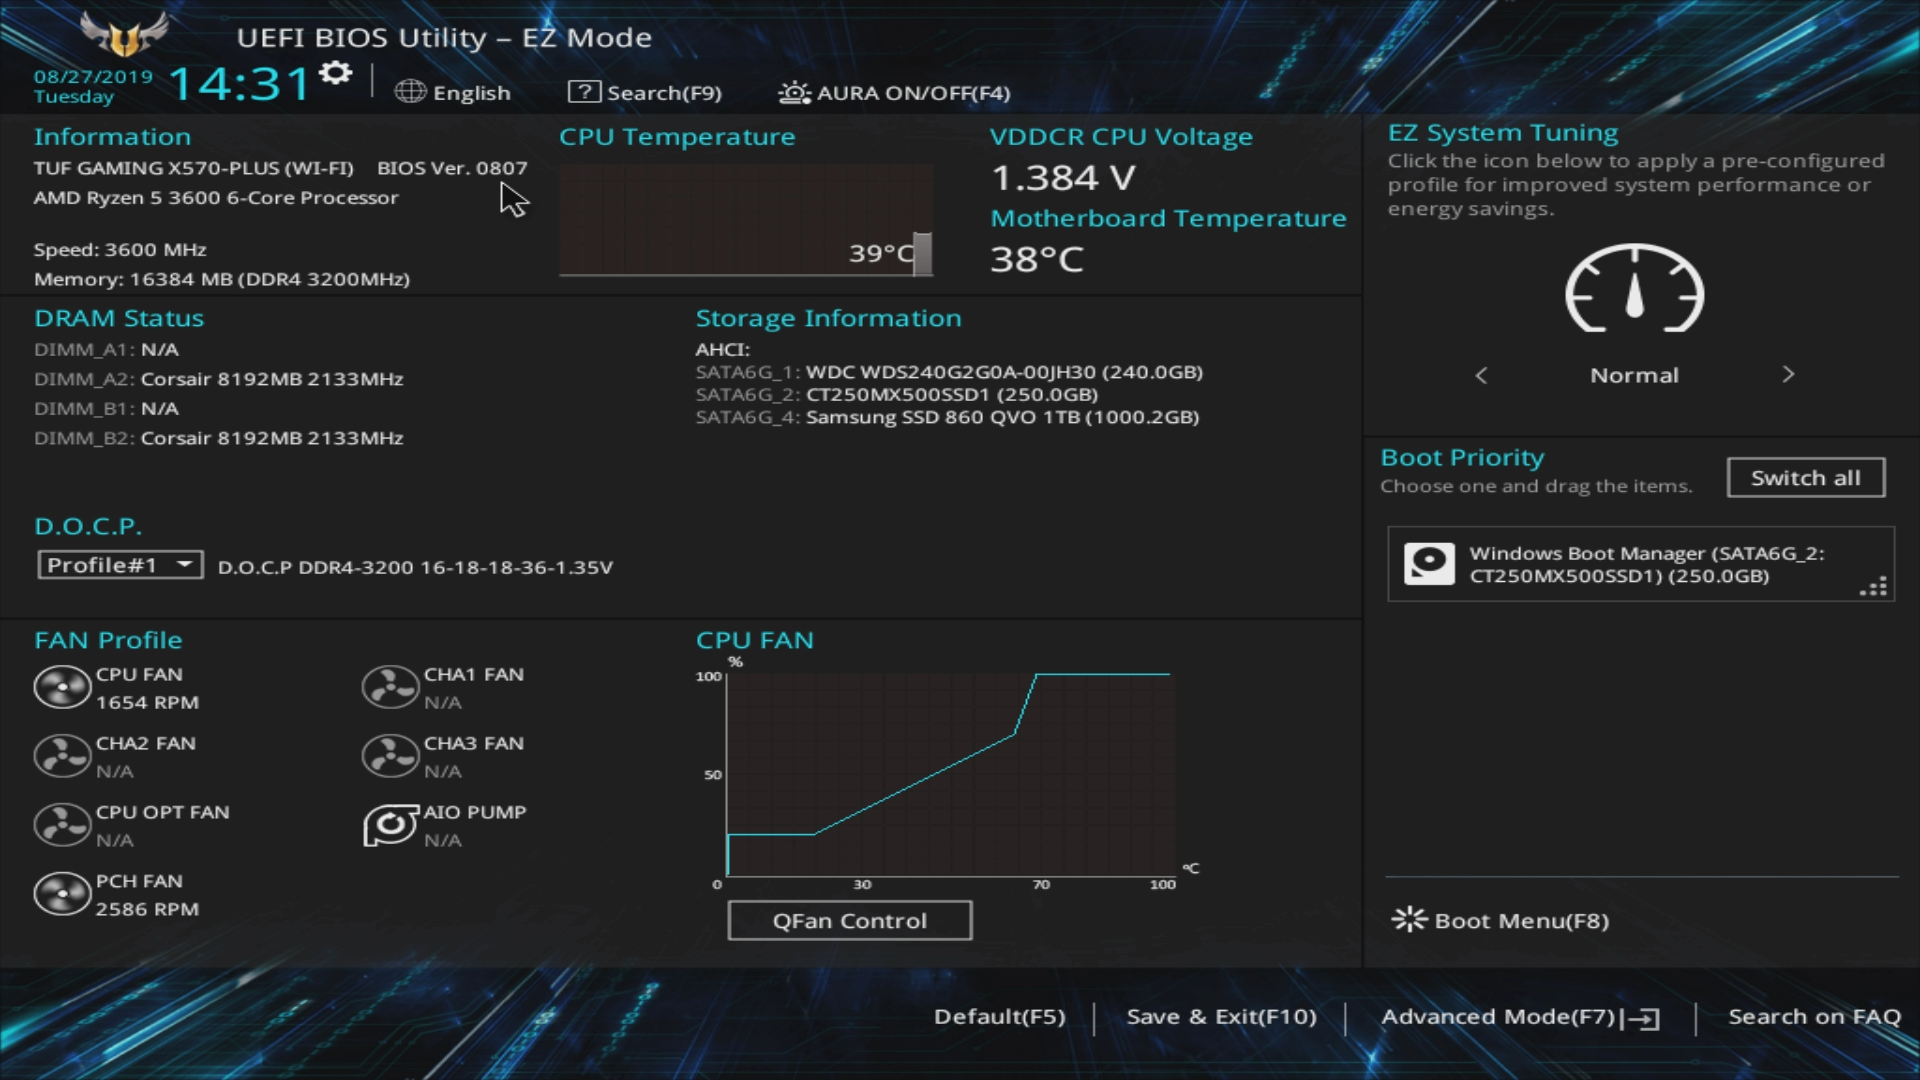
The easiest way of checking what BIOS version you are running is to enter the BIOS. You can enter the BIOS by pressing the dedicated BIOS keyboard button (usually delete or F1). Once inside the BIOS, you will see what version you are running on the first page. It is usually found next to the motherboard model name.
How to check your BIOS in Command Prompt
If you don’t feel comfortable entering into the BIOS, there are other ways of checking what BIOS version you are running. The command prompt is a great place to start.
This method of checking the BIOS is done inside the operating system. Follow these steps to check your BIOS version in the command prompt:
Step
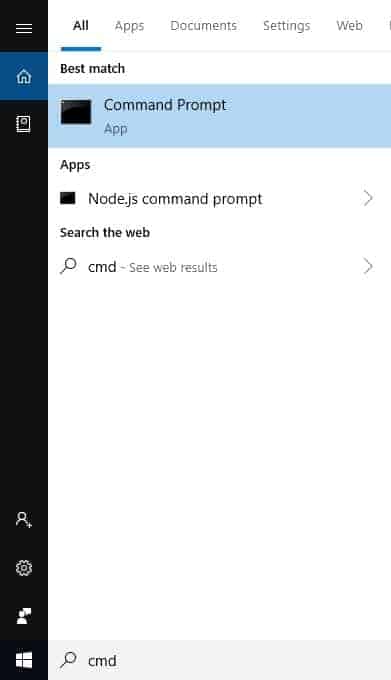
Open Command Prompt
Start by typing CMD into the Windows search bar. Select the “Command Prompt” from the drop-down menu.
Step
Check BIOS version
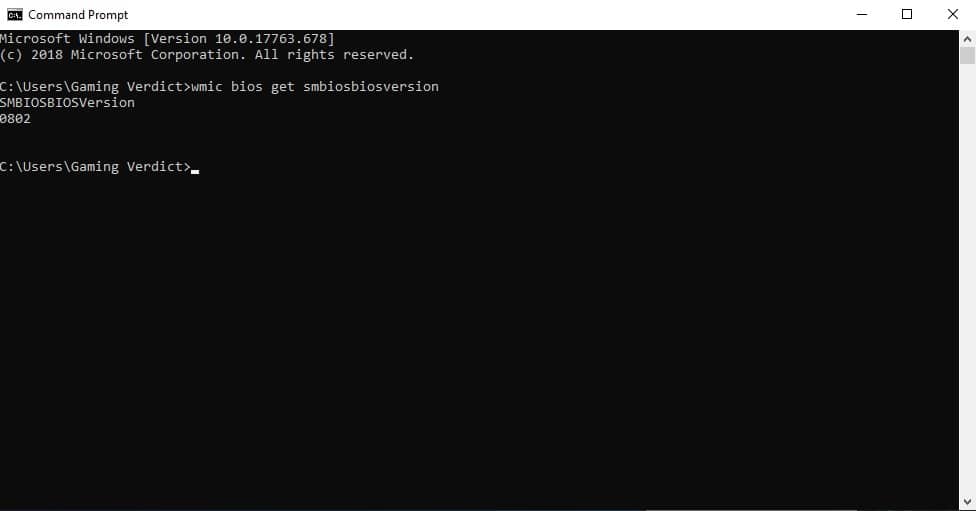
Once the command prompt has loaded, copy and paste the following command into the prompt and click enter.
wmic bios get smbiosbiosversion
Underneath SMBIOSBIOSVersion, you will see the BIOS version you are currently running. In my scenario, we are running version 0802.
How to check your BIOS in System Information
Another very simple method of finding out what BIOS version your motherboard is running is to check in the system information. You can do this by following these steps:
Step
Run msinfo32
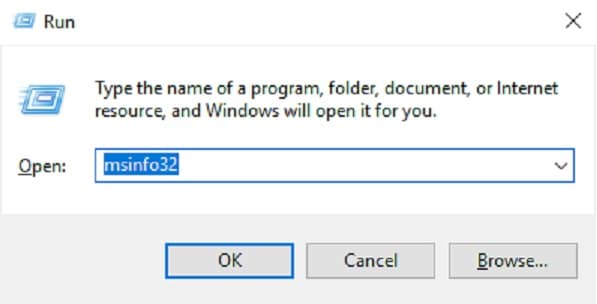
Open the Run taskbar by pressing “Windows key+R”
In Run, type the following command and click OK
msinfo32
Step
Find BIOS version/date
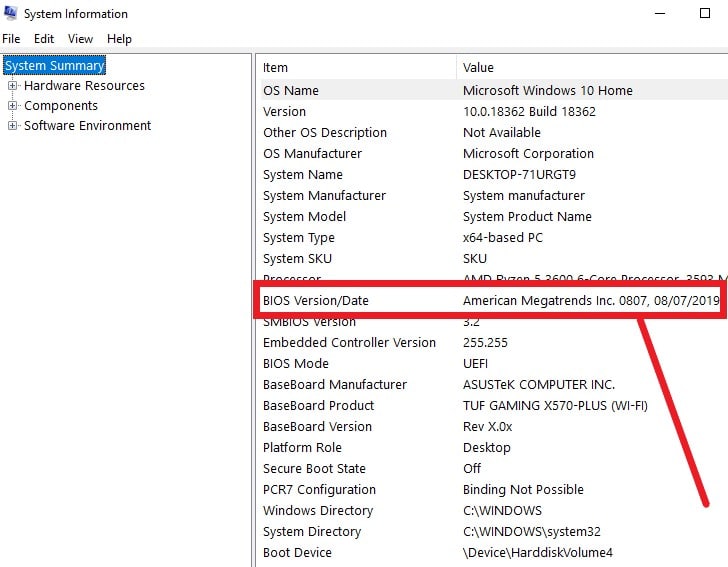
This command will take you to the System Information window. In here, you will be able to find a ton of information on your PC. In this case, we are looking for the BIOS Version. You can find this by scrolling to the BIOS Version/Date Item. See image below.
Checking if a New BIOS Version is Available
Once you have established what BIOS version your motherboard is running, the next step is to find out whether your board is up-to-date with the latest version.
The easiest way of doing this is by checking with the manufacturer. By this, we mean, go to their website and find your motherboard in their products list, going to support and checking the BIOS section to see if yours is the latest. If the BIOS version you are running is not at the top of their list, then your BIOS is out-of-date.

Reasons to update BIOS
Before physically updating your BIOS, it’s definitely worth knowing the reasons why you should keep it up-to-date. We did touch upon those reasons earlier, but to reiterate, we will outline those reasons again.
Fixing common bugs
One of the most common reasons a manufacturer will bring out a new BIOS version is to fix reported bugs. Reported bugs are nothing new; they can be found across most aspects of a build and is one of the main reasons why manufacturers constantly bring out updated drivers and BIOS versions.
CPU compatibility
Another common reason why a manufacturer will release a BIOS update is to allow upwards compatibility with newer technology. Specifically CPUs. Just take the new Ryzen 3rd Gen CPUs as a prime example. They are compatible with 300 and 400 series motherboards. However, to attain that compatibility, you must update the BIOS.
BIOS update for a new build
AMD has recently taught a lot of people a very valuable lesson. You must always check the compatibility of your components before purchasing a new build, especially when new hardware has just been released.
When AMD released their new Ryzen 3rd Gen CPUs, everyone flocked to grab one as they promised hugely impressive performance stats at a price point below their rivals. However, what some people did not plan for, was their new CPUs not working with their old 300/400 series motherboards. Forums were flooded with questions asking how to get their new chips working with their old boards. The answer was a simple BIOS update.
It’s one of the main reasons why manufacturers release BIOS updates and a very important one for those consumers purchasing Ryzen.
Ryzen 5000 series BIOS updates
AMD’s highly anticipated Ryzen 5000 series release is imminent and with no new chipset for the Zen 3 based processors, you are going to need to update your BIOS for several models from various manufactures.
While the compatibility to the initial launch of processers will be limited to specific boards, Asus is already starting to provide BIOS updates for the AMD 500 series chipsets. Unfortunately, AMD fans with 400 series chipsets will have to wait till January 2021 and onwards for further support. From what we have seen, users with X570 and B550 chipsets can expect out the box compatibility, with a small update required to ensure you get the best out of your chip.
How to update BIOS
Now that you understand a little about what the BIOS does, and what the updates offer, it’s time to show you exactly how to update the BIOS.
For this, you will need the internet and a USB flash drive. Let’s begin.
Step
Find the latest available BIOS version
You can do this by going to the manufacturer’s website and searching for your motherboard. Once you have found your motherboard, select the “Support” tab and find the “BIOS” section. If your BIOS version is outdated, simply download the new BIOS version and save to desktop.

Step
Unzip the BIOS update file
Once the BIOS file has downloaded, you’re going to want to unzip the file directly onto your USB flash drive. Do this by right-clicking the BIOS update and selecting the “unzip” option. If this option is not available, you may have to download software to achieve this step.

Step
Now that you have the file on your bootable USB flash drive, it’s now time to enter the UEFI firmware settings and install the update. Do this by first, restarting the computer. When the PC is loading up, right at the start, tap the dedicated BIOS key for your motherboard until it enters you into BIOS. It is usually DEL/F2.

Step
Launch the BIOS firmware update tool or flashing tool
For our particular motherboard, we had to enter into the advanced tools section. Usually, this is the F7 key on most motherboards. Inside advanced, you should find an option to launch a flash update. On ASUS boards, it’s called the “ASUS EZ Flash 3 Utility”.

Step
Select the flash drive to launch update
At this stage, you must select what drive the BIOS will use to update from. Select the Flash drive or “storage device”. If you have selected the correct drive, you should see the BIOS update file you downloaded earlier. Select the file by double-clicking it. Your BIOS will ask you whether or not you want to load this file, say yes to start the update process.


Step
Completing the update
Once the BIOS has finished updating you will be prompted with a message. At this point, you will be asked to click, OK, and your system will restart.
Upon restarting, your system may ask you to enter into the BIOS and run setup. All this requires is for you to re-enter the BIOS and restart the system again. We would recommend at this point to run optimized default settings.
Just make sure you re-enable any XMP / DOCP profiles you have enabled, as loading optimized defaults will disable them.
Let the PC restart, and it should boot into your operating system.


How to update the BIOS using the M or Q-flash utility.
Both processes are pretty much identical and very straightforward. All you need is a PC and a USB drive to store the update – an external hard drive will do the trick but it MUST be formatted into the FAT32 file format. If your hard drive has data stored on it, it will all be erased in the drive formatting process. So, please make sure all your data is backed up.
Step 1: Rename the BIOS file
We’re going to be continuing from step two of the previous method. Once you have the BIOS located in the root of your USB drive you’re going to need to rename it. Every motherboard manufacturer has a specifically required filename in order to initiate the update.
This is a security measure as this process requires no human intervention, so the BIOS will only install if it’s named something specific, a password of sorts. This prevents any old fine from being grabbed and installed onto your motherboard, causing catastrophic corruption.
We’re going to use MSI as an example here. To flash the MSI BIOS we need to name the latest BIOS file ‘MSI.ROM’. This name is different to every motherboard manufacturer and will be available from your motherboard manufacturer’s website. While you’re there it wouldn’t hurt to look at the readme file your BIOS comes with if you’re ever unsure about anything.
Step 2: Insert the USB drive into your PC
Now you need to plug the USB drive into the motherboard directly, but you can’t just put it in any old USB slot. On the back of your motherboard, there will be a USB slot marked ‘BIOS’. This USB slot is completely standard when the PC is running but has a special function when flashing a motherboard BIOS.
Step 3: Turn off your computer
Now that you have your USB drive inserted you need to turn off your PC. as this process does not require the system to be booted.
All you need do is locate and hold down the small bios flash button, usually located in the general vicinity of the BIOS labelled USB port. Once you have found the button, hold it down until a light starts flashing. This means your motherboard has entered what’s called ‘flash mode’.
Note: BIOS flashes are the same concept on every board but some motherboards handle them differently. Some motherboards can flash BIOS files passively but some will have to boot the system to begin the process. Your PC may restart a time or two during this process, again it’s system / BIOS / CPU / motherboard dependent.
Step 5: Wait for the light to stop flashing
You need to wait for the light to stop blinking, only then will you be able to use your PC again. Stopping a BIOS update mid-way through can cause damage and corruption – the BIOS can just be flashed again but it’s best to avoid the damage altogether.
There you have it, that’s how you update or flash the latest BIOS using BIOS flashing utilities.
How to update BIOS : Final word
And there you have it, the comprehensive guide on how to update your BIOS.
Some BIOS menus may differ depending on the brand, but as a rough guide, this will work for almost any board. The board we updated was the ASUS TUF x570 Gaming PLUS WIFI. It took approximately 10 minutes from start to finish.
If you have any questions regarding BIOS or need help updating it, feel free to drop us a message in the comments section below. We will get back to you as soon as we can!