Razer Synapse guide
What is Razer Synapse? We've written a handy guide for some of the features in Razer Synapse 3
Share this article...
WePC is reader-supported. When you buy through links on our site, we may earn an affiliate commission. Prices subject to change. Learn more
MIce, keyboards, and headsets have become more and more complex over the last few years, lighting, macros, and settings profiles are all feature standard these days. As the products continued to evolve it became untenable to have all the controls physically situated on the peripheral in question. This led to the absolute flood of software suites that compete for RAM and need seemingly constant updates. Today we’re going to give you a Razer Synapse guide that will show you how to use some of the more difficult features in Razer Synapse 3.0
What is Razer Synapse?
Synapse is Razer’s all-in-one software suite for use with their peripherals. it has many features depending on the peripherals in question and is capable of a lot, including lighting, macros, shortcuts, keybinds, performance tuning, the list really does go on. Synapse was initially released in 2011 and has been through many iterations since then, the most current version of Synapse is V1.3.195.250. However, the tips and tricks in this Razer Synapse guide will continue to be applicable and we’ll update this page in the event of any changes.
Razer Synapse download – Where to get it
Synapse is available from Razer’s main website, we’ve listed some of the more popular regional links below
- UK – https://www.razer.com/gb-en/synapse-3
- EU – https://www2.razer.com/eu-en/synapse-3
- US – https://www.razer.com/synapse-3
- CA – https://www.razer.com/ca-en/synapse-3
How to update Razer Synapse
You’ll usually be prompted by a desktop notification when it needs updating, but if not Synapse will pop up a window when you open it. Additionally, if you navigate to settings then click the ‘about’ tab, there’s an option to check for updates.
How to use Razer Synapse Features
There are a lot of features to go through here, some of them are fairly simple, the others might take some practice.
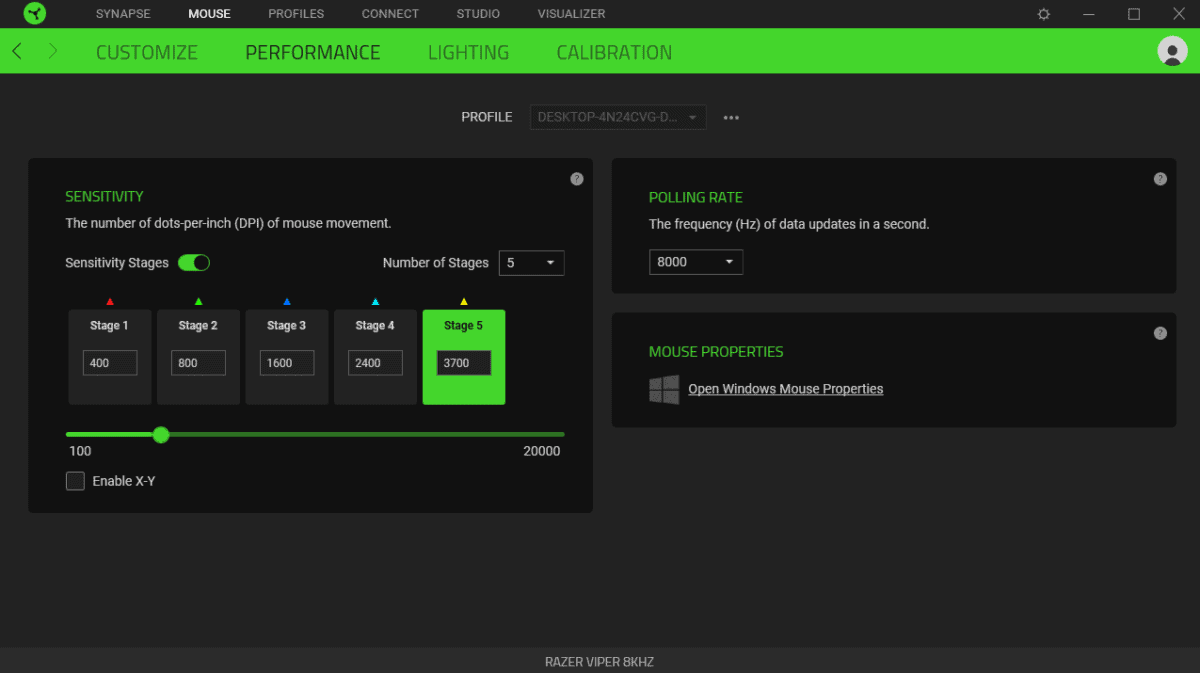
Razer Synapse – How to change mouse DPI
Changing your mouse’s DPI is how you adjust the sensitivity, The higher the DPI the faster the mouse will move. In order to do this in Synapse 3, navigate to mouse > performance > sensitivity. Additionally, you can save up to 5 different ‘stages’ each with a predetermined DPI. This gives you the ability to quickly switch between different sensitivities on the fly. This is usually accomplished by tapping a button found either just behind the scroll wheel or on the underside of the mouse.
Razer Synapse guide – How to make a macro
Macros are a powerful tool that allows you to essentially record a series of inputs, and have them activated in the same order with a push of a single button. To create a macro in Synapse you must first download the ‘Macro’ module. To do this open Synapse, navigate to ‘modules’ and scroll down until you see the ‘macro’ module and hit download. After this, you’ll be prompted to install and restart your PC.
Once you’ve restarted your PC the Macro module will appear in the ‘installed modules’ section of Synapse. The next step is to open the macro module and start recording.
How to record a macro in Razer Synapse
Once you’ve opened the Macro module, you can begin creating your very own macro. First, hit ‘record’, You’ll be given a countdown, then you can click and or type and press mouse buttons in any combination you want, and synapse will register both the keys and buttons being pressed and released. Additionally, you can insert commands and text too.
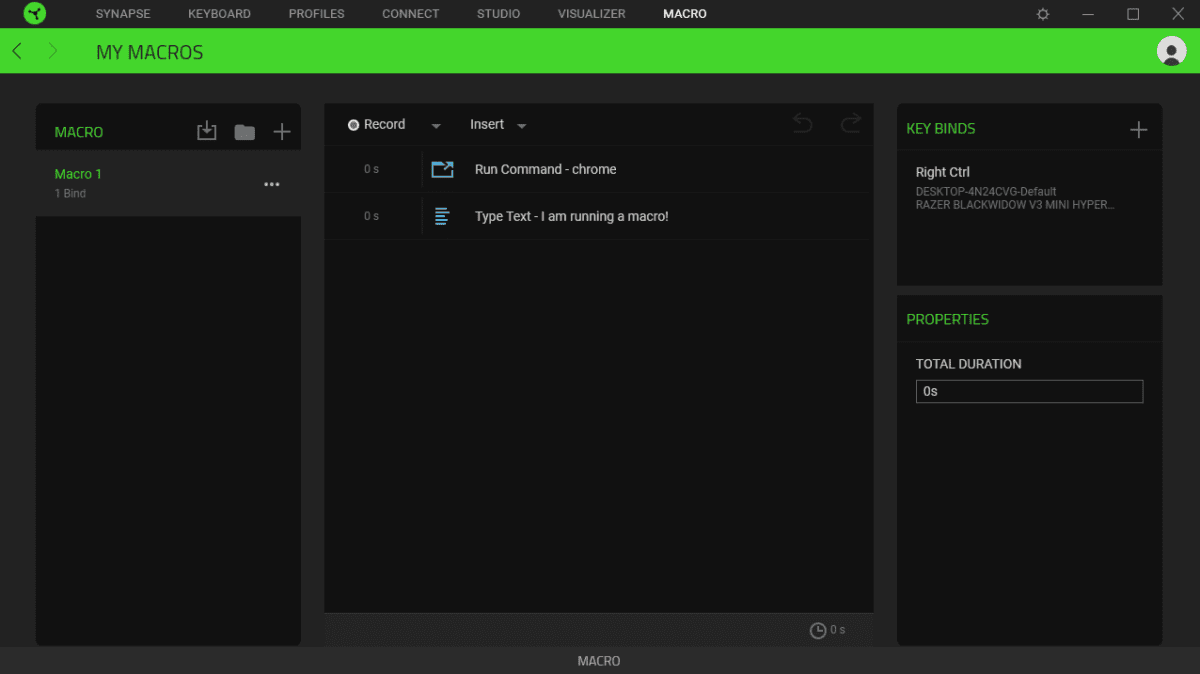
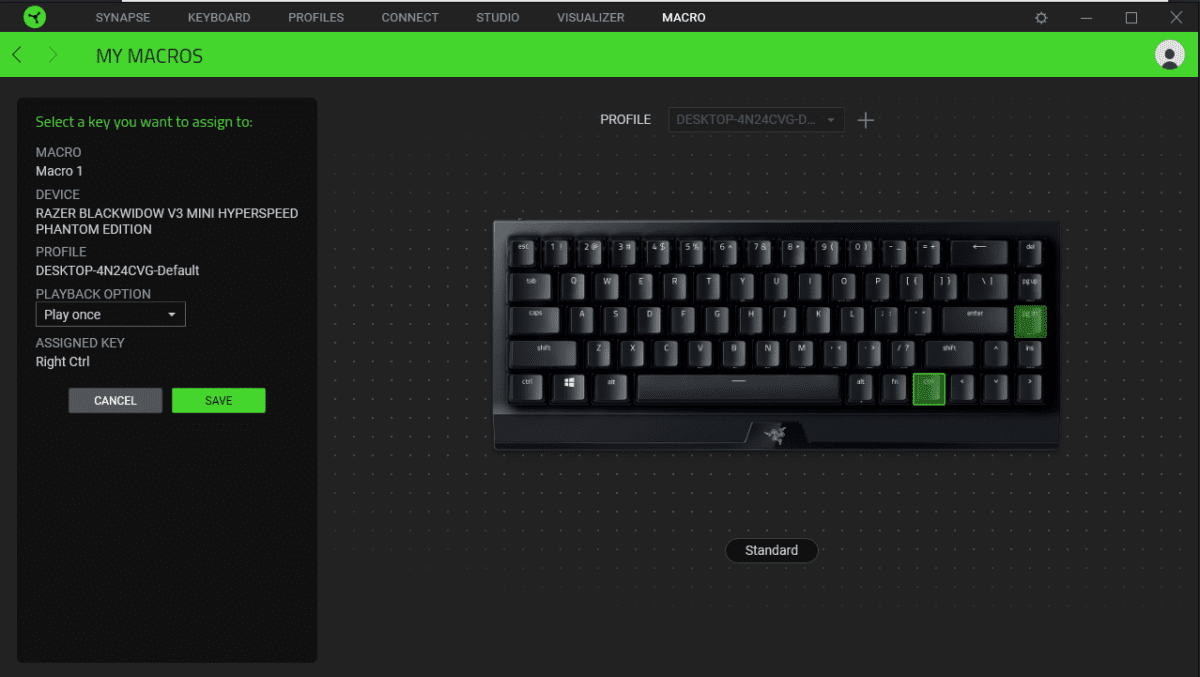
The next step is to bind the sequence of instructions to a specific key, or a combination of keys. Bear in mind here that you might want to avoid key combinations that are already used for common shortcuts, for example, Ctrl + C and Ctrl + V.
Congratulations, you’ve now set up a Macro in Razer Synapse. We strongly recommend looking into macros as they can be huge time-savers in terms of productivity. Additionally, they are very useful for gaming as they can allow you to open programs, run commands, and execute keystrokes without having to tab out of your game.
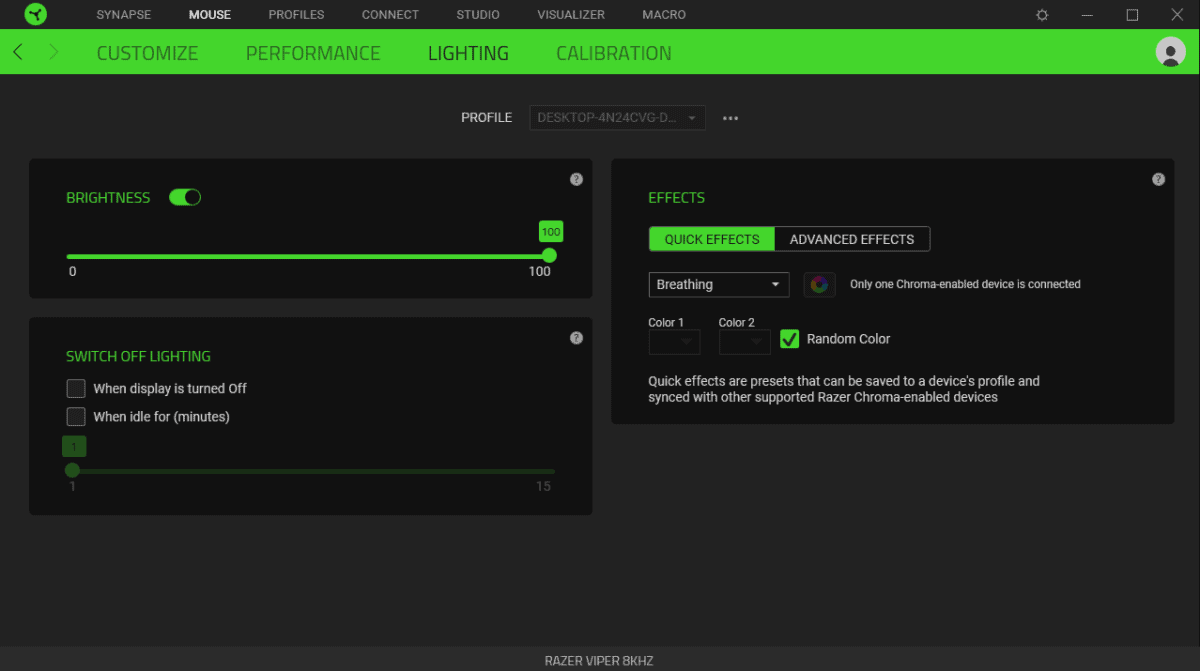
Razer Synapse guide – How to customize lighting
One of the more fun features in PC gaming peripherals these days is the relative ubiquity of RGB lighting, and Razer is particularly notorious for this. Luckily, Synapse has a load of pre-installed lighting effects which can be applied with a few clicks. Synapse also has a module known as ‘Chroma Studio’ which allows you a large amount of freedom to make your own lighting effects with relative ease.
To choose from the pre-installed lighting effects simply navigate to the tab relating to the device in question, This will usually be titled ‘mouse’, ‘keyboard’, or ‘headset’. Or any Razer product that works with Synapse. Then click ‘lighting’ and choose from the range of pre-installed effects under the ‘Quick Effects’ dropdown menu.
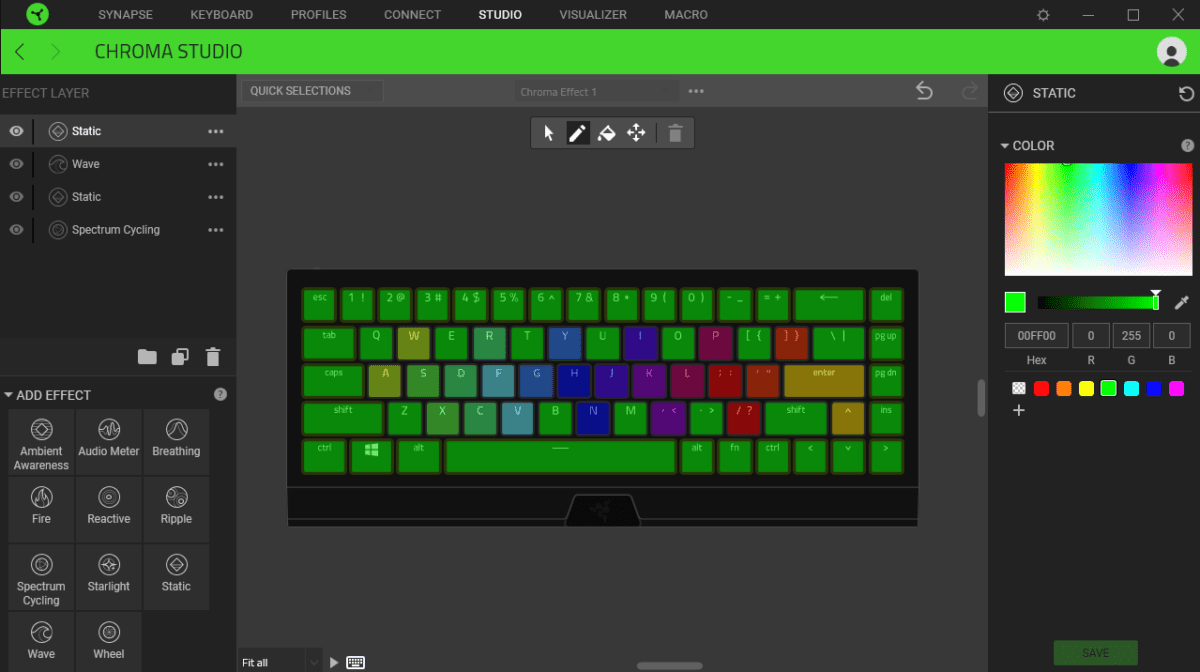
Razer Synapse – How to use Chroma Studio
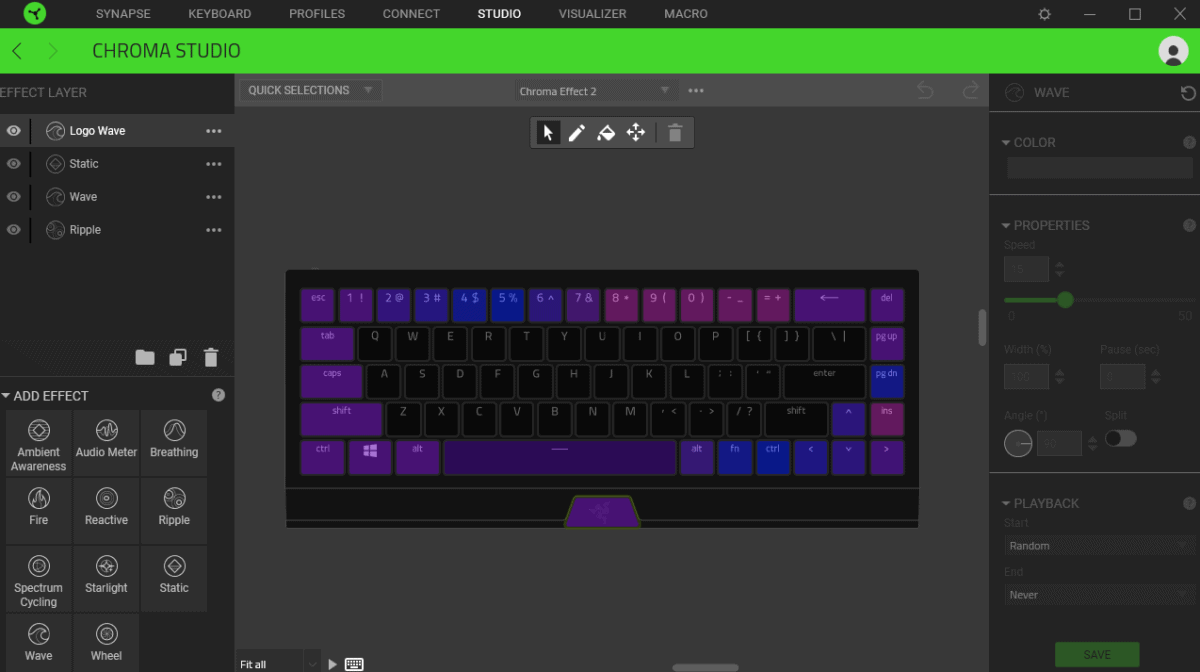
If your Razer peripheral is Chroma Studio compatible, then simply hit the ‘advanced effects’ button. You’ll then be taken to the Chroma Studio where you can customize lighting effects to your heart’s content. You can mix and match the pre-installed effects with your own on a per-key basis.
Once you’ve created your chosen lighting effect, simply click ‘save’ and it will be applied to the peripheral in question, you can also sync multiple compatible Razer peripherals to all display this custom lighting effect. If you’re having trouble creating something cool, or simply don’t want to bother then you can have a browse over at /r/ChromaProfiles as Synapse allows for sharing of custom profiles.
How to import Razer Chroma profiles in Synapse
Luckily for you, the aforementioned subreddit is full of fun profiles, and importing them into Razer Synapse is a simple process. First, download the profile of your choice, then go into Chroma Studio and click the three small dots immediately to the right-hand side of the currently selected lighting profile.
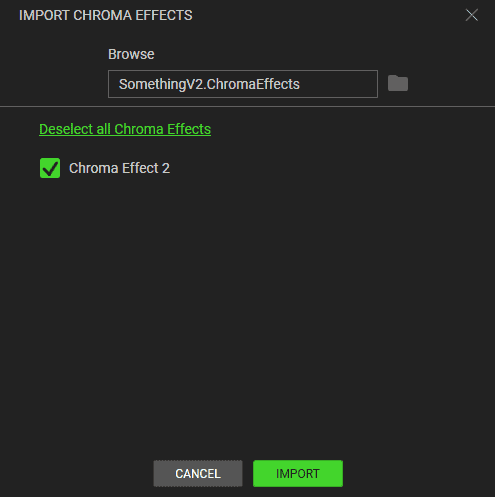
You will then be greeted by a window that allows you to open the file explorer and locate the effect in question. Simply double-click it then hit the ‘import’ button. After this, select the profile in the central drop-down menu.
Final word
There we have it, a comprehensive and concise guide on some of the trickier features of Razer Synapse. You’re now equipped to create macros, make custom lighting effects, and import other creations from the PC gaming community. Once you get to grips with Razer Synapse it becomes a streamlined and powerful piece of peripheral paraphernalia. Go forth, make some cool stuff and truly customize your PC gaming accessories. Additionally, if you have peripherals from multiple manufacturers, you might want to check out our page on OpenRGB, a free-to-use utility that supports devices from all companies.