
Ember Knights Bosses: Mini bosses and area bosses guide
Here is a guide to the bosses and mini-bosses in Ember Knights.
Share this article...
WePC is reader-supported. When you buy through links on our site, we may earn an affiliate commission. Prices subject to change. Learn more
Ember Knight has plenty of bosses to encounter in the game. Throughout the game, you will encounter a mini-boss in each area and a final boss that allows you to ascend to the next area. More so, each of these bosses comes with a plethora of tactics and styles that you will to learn to overcome. Here is an Ember Knights boss guide
Ember Knights bosses
Every biome has a total of two bosses you can fight. One of them is a mini-boss, which you find in the middle of a run. The other is the area boss, which is the final boss of the stage you are on. When you get to a mini-boss, the game tends to generate a random mini-boss of that stage’s pool. These different mini-bosses only have a few variations on each other, with slightly different takes on the bosses’ skills.
We only encountered one mini-boss in the second and third area in the preview build we played, while we got all four in the first area. It could be a luck thing, or there were a limited number of varieties in the preview build since it is in early access.
As for the final boss, these tend to be the big bads of the level. Each is themed appropriately with the environment, and they have some familiar skills that you will be familiar with, thanks to the regular enemies in the area. However, they hit much harder and have other unique skills to avoid.
Ember Knights Boss Tactics
Each area has a unique set of mini-bosses and a final boss. We will split the areas up into their own sections.
Area 1

The forest biome contains four different mini-bosses that we have encountered. These are:
- Sanguinesucka
- Guzzle Wound
- Plague Bringer
- Gust
The four represent different colors of a mosquito type boss. Each of the bosses has their own take on the skills, which include melee attacks, tornadoes, AOE body slams, charges and other ranged projectiles to avoid. We advise learning to dodge the back-to-back melee attacks they do and to dodge the tornados and the body slams.
For example, Gust is more focused on tornados. Most of the bosses send tornadoes front eh front of the boss, while Gust spawns them throughout the map and they fire off in random directions. Moreso, Gust tends to charge three times. Meanwhile, Sanguinesucka will spawn red pools around the area that will drain your health if you stand in them. Plaguebrearer does something similar, but the hazard zones linger longer and dashes three times, and leaves behind poison trails. Lastly, Guzzle wound is more concerned with performing the biggest light attacks and bigger AOE body slams.
The final boss of the first area is Skrixxa Za, a giant beetle type boss with an eye patch. The boss has a few different skills to avoid. Furthermore, the boss has different skills, or themes that are separated via the phasing of its health bars.
First Phase
- Legs and claws attack directionally to where you are. You can perfect dodge to avoid damage.
- 360-degree spike attack, charged up with a 360 red circle around the boss’ model.
Second Phase
- Boss hunkers down and causes small raindrops of pink poison you need to avoid.
- Summons tiny beetles to attack you.
- Same leg and claw attack patterns as phase 1
Third Phase
- Essentially repeats Phase 2 with even bigger purple rain poisons zones to dodge.
- The boss also summons the giant beetles you face from the other maps.
- Repeats phase 1 moves.
Area 2

The second area is the frozen knight kingdom, filled with archers, witches, wizards, knights and lance chargers. The only mini-boss we encountered during the preview is the Royal Phalanx, which is a giant ice mob with a giant slab of ice as a shield. There will more than likely be more deeper into launch, but rest assured, if there are then it will likely follow the area 1 trend of having slightly different skills.
The Royal Phalanx tactics vary from a range of skills. The boss will do heavy hitting yet well-telegraphed melee swing switch its ice shield throughout the fight. It will also raise its shield over its head and do a line slam in your direction you can roll away from. Moreso, it will do a skill that bounces ice around the area you need to dodge. Later in the fight, the boss will spawn ice soldiers, which will try to harass you but you can kill them in one hit. Also, the boss will continuously spawn flags that freeze an area, slowing your movement. You need to kill these flags to make it easier to avoid the ice soldiers and the rest of the Royal Phalanx’s skills.
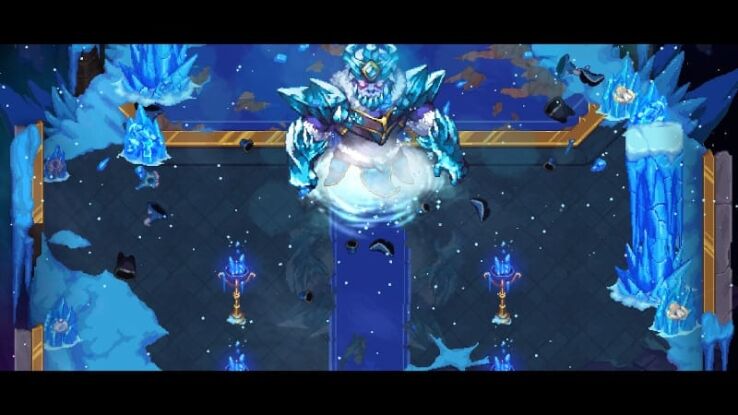
The final boss of the zone is Lord Bruma. Lord Bruma is a three-phase fight with a variety of skills. Note, the boss has a phase intermission when you push into the next health bar. You will need to dodge a variety of ice blades that fly from both sides of the screen before the boss eventually returns to the floor.
First Phase
- In the first phase, his most noticeable skills involve throwing ice at your location. Dodge them and then continue to deal damage. to get into the next phase.
Second Phase
- Repeats phase one skills
- There is also a wave of ice that emits from the boss. Run as far south of the room as you can to avoid getting frozen in place.
Third Phase
- Repeats the first two phases of skills, but everything is faster.
Area 3

The third area is a haunted village, filled with magical rats, assassins, effigies, floating skulls and spirits.
The mini-boss the is the Herald. The herald is one of the harder bosses in Ember Knights, as it tends to ado a variety of ranged attacks, floor hazards that trap you, and teleports around the room. The ranged attack is a series of balls that circle the boss, which ping out across the room and are sent in waves. The key to beating the fight is to dodge the purple food hazards that stun you, as they tend to be the reason why you get hit the most.
As for the boss, you have the Endless Empty Hunger Phantom. The boss is extremely mobile and extremely tanky. Throughout the fight, you will be dodging many line attacks, charges, and a variety of ranged attacks. Think of the fight like the Herald, but even more hectic.
This concludes this Ember Knights Boss guide. Remember this is early access, and there’s plenty still to come and change.


