How to Beat Rennala in Elden Ring
The Queen of the Full Moon isn’t too hard to cut in half
Share this article...
WePC is reader-supported. When you buy through links on our site, we may earn an affiliate commission. Prices subject to change. Learn more
After bringing down Godrick, Rennala, Queen of the Full Moon, should be the second Shardbearer on your Elden Ring kill list. Rennala is the leader of the Raya Lucaria Academy of Sorcery, and you will meet her after touring the academy, overcoming minor hurdles, and defeating one other boss.
She’s one of the more fascinating bosses in Elden Ring, and each of her two phases is pretty distinct in terms of mechanics and skills required.
When should I face Rennala in Elden Ring?
Fighting Elden Ring bosses is primarily determined by your weapon upgrade level, so upgrading your weapon for a minimum of +7 for the Rennala encounter is a good idea.
In addition to your own personal skills and keyboard/controller dexterity, your character’s overall level is important, which is why I recommend leveling your character to 38-45 to have the best shot. But remember, your level will not be the determining decision.
How hard is the Rennala, Queen of the Full Moon boss fight in Elden Ring?
Rennala is a mage, so don’t bother enchanting your weapon with any special status effects – she’ll be resistant to them. She, like Godrick, takes Bleed damage, but it won’t be the factor that cuts down her health significantly.
However, because she is a mage, her poise is relatively weak due to her armor. Melee attacks will win the day in this situation. Try wearing magic-resistance armor if you can, but be warned that there is a trade-off as your total Poise and physical defense will suffer as a result.
If you’re struggling, you have the option to bring in a Spirit Summon during the second portion of the fight. Once again, anything works as long as it can endure long enough and keep the boss interested enough for you to deal damage. However, due to the nature of the conflict, a summon with numerous little helpers will perform well here.
Guide to Beating Rennala Easily in Elden Ring
With the Rennala fight, at least in the first phase, the aim is to figure out the repeated element and navigate it enough times to advance to the second phase, where the true battle begins.
The first phase is easy. Don’t let that fool you. Many players become cocky and let their guard down, expecting the second phase to be a cakewalk. If you have that attitude, be prepared to be brought down almost instantly!
Focus on conserving your healing items as much as possible in the first phase to prepare for the following one. Every little helps!
Part One of the Rennala Boss Fight:
The initial part of the Rennala combat is simple: destroy her protective barrier to bring her falling down, allowing you to deliver substantial damage.
Depending on your weapon’s strength, you may need to repeat this process two or three times. Rennala remains on the ground for a few seconds after each crack, but she ultimately levitates and builds a new barrier.
To get through her barrier, you must murder her offspring who are attempting to keep it up. The arena is filled with these children, but the majority of them are just decoys.
Each time, you must kill three offspring for the barrier to shatter. The key to finding which aren’t decoys? Keep an eye out for a golden glow around specific offspring – those are the ones you’re looking for. The golden aura is hard to spot, so you’ll have to navigate around the arena to find them. Their song will fill your ears too, which can help if you can’t spot them outright!
Rennala’s battlefield is dark, moody, and full of nooks and crannies. It may take some time to identify the final offspring required to break the barrier. Offspring become better at hiding from you as the battle wears on.
Keep an eye out for the other offspring lying in wait behind corners. Before you know it, you’ll have a heart attack and lose the battle if you don’t pay attention!
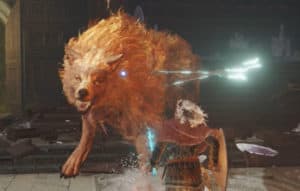
Rennala has one major strike that involves her sucking up her offspring, transforming them into missiles, and hurling them at you. Very motherly.
Avoid this projectile barrage where you can. Death is almost sure to follow swiftly if you absorb the whole barrage.
Learn to anticipate the assault and place as much cover as possible between you and her until it’s finished. Bookcases and other shelters are destructible, so as the phase wears on, this will become more and more difficult.
Keep in mind another of her super damaging attacks: an enormous energy blast attack, which she performs on the ground just as her barrier is repaired, allowing her to climb once more. When you see her charging, stay as far away as possible and don’t get greedy – it’s not worth the risk!
Part Two of the Rennala Boss Fight:
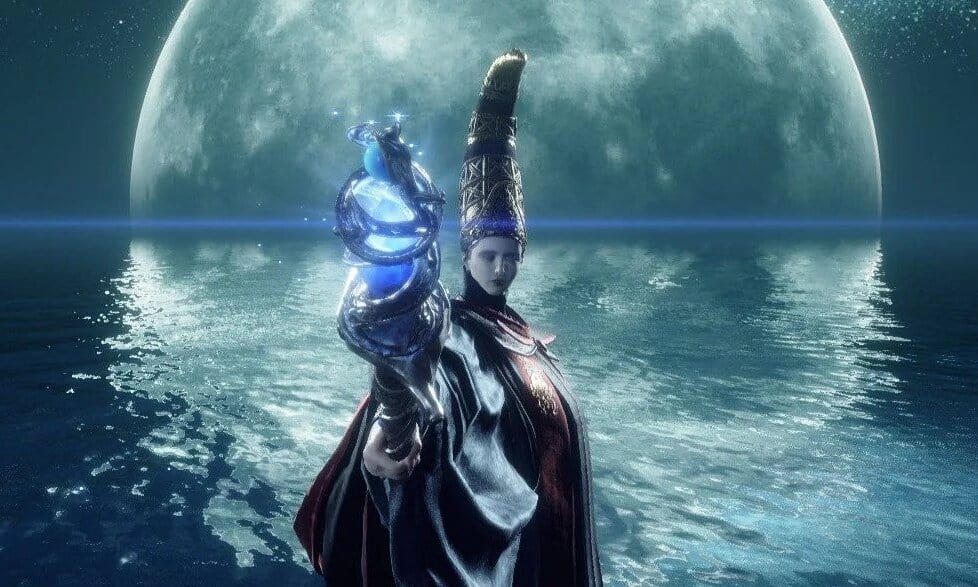
As you likely expected, Phase Two is, obviously, much more difficult, as it is more of a classic boss battle and is made up of two smaller parts. The second phase takes place in a new venue. Prepare for no shelter this time.
Rennala begins by shooting a beam at you. To dodge it, simply dash to either side. Other, slower spells, preferably aimed towards her, can be evaded instead. Rennala may be yanked out of these casting animations, and several of them have extremely long indicators that give you ample time to either come closer or prepare to evade them.
Dealing damage in this section of the fight is trivial, thanks mainly to Rennala’s vulnerability to staggers. The idea, of course, is to move closer to her instead of spending the entire fight attempting to escape her spells – which she will use to keep you at a safe distance.
Rennala will occasionally generate a moon that will trail you and then explode after a while. It is, however, gradual and easy to avoid. Just keep an eye on it as it speeds towards you.
Just when you think you’ve made significant progress, when her health falls below 50%, the most difficult part of the fight will begin. Rennala’s ranged assaults will continue, but she will also conjure Spirit Ashes to help her battle you.
She’ll begin with smaller summons, such as the Lone Wolves summon, then eventually progress to the larger and more powerful summons as her health drops. Every summon will merely execute two or three attacks before disappearing, so don’t bother pursuing them. Avoid their attacks and get close enough to Rennala to strike a few blows before backing off.
When she summons, she will be shielded by a white aura on the ground that will do damage if you step in it or are touched by it. This is why your summons are so crucial in this period since they will ease the pressure off of you. Just be cautious not to get mixed up about whose summon it is out there because they all look the same, and you may both be summoning the same Spirit Ash.
As always, if she’s performing an extravagant maneuver, don’t be afraid to shoot some ranged attacks at her from a safe distance. Even if they don’t stop her casting, they will prevent her armor from recharging, increasing the likelihood of her being staggered.
If you have any remaining Focus Points, this is the moment to use any special moves your weapon may have. Close-range attacks, such as Bloodhound’s Finesse, are highly effective.
What does Rennala’s Great Rune do?
After (eventually) defeating Rennala, you will receive her Great Rune.
Despite coming from a Shardbearer, the Great Rune does not operate like the one you obtained after beating Godrick; therefore, you will not be able to wear it and gain a boost. Instead, the Great Rune of the Unborn is used to reset your stats to zero, enabling you to reallocate them any way you see fit.
Rennala will then become an NPC, to which you may return if you desire to re-spec during the game.