
Windows 11 TPM 2.0 bypass: How to install without TPM 2.0
Bypass Microsoft's TPM 2.0 security
Share this article...
WePC is reader-supported. When you buy through links on our site, we may earn an affiliate commission. Prices subject to change. Learn more
Today we’re going to talk all about the Windows 11 TPM 2.0 bypass and show you how to install Windows 11 without TPM 2.0. If you’re not sure about the specifics of this, don’t worry – everything will be explained. Back when Windows 11 released, some users were running into trouble trying to update to the newest edition of the operating system. That’s because of the harsher system requirements, rendering some older devices outdated, sometimes requiring the addition of a more modern CPU.
READ NOW: Check out the best CPU for gaming right now
That’s not all, however. As Microsoft continues to beef up the security of the popular OS, one requirement for the installation of Windows 11 is the inclusion of TPM 2.0. This means that your motherboard will have a layer of security on your PC at all times.
However, not all CPUs and motherboards are born the same. Older chips or systems may not have a TPM 2.0 chip, meaning that you’re left without an obvious way to install Windows 11. But if you’re in that particular boat, do not despair, as we may have a fix for you that’ll get Windows 11 running with older hardware by bypassing the TPM 2.0 requirement.
How to install Windows with TPM 2.0
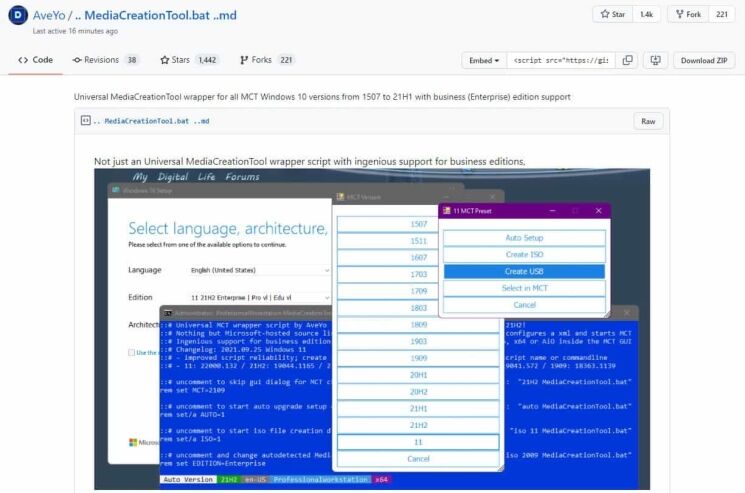
A user by the name of AveYo on Github has released an open-source media creation tool that should allow you to bypass Microsoft’s mandatory TPM 2.0 requirement.
However, do be aware that this is not officially supported by Microsoft, and is recommended for users who know their way around Windows and are not afraid to get their hands a little bit dirty getting this up and running.
We are not responsible for any damage you might cause to your systems by adhering to this method of installing Windows 11. However, the method itself isn’t too difficult and can be done with relative ease, thanks to AveYo’s handy Powershell scripts.
Step
Download AveYo’s open source Media Creation Tool
Go to this link to the Github page that will display AveYo’s Media Creation Tool. Don’t worry, the page might look scary but all you need to do is one simple thing.
Click the green button labelled ‘Code’ you should see the text which says ‘Download ZIP‘. Download them to any folder of your choice. You may also see the ‘Download ZIP’ button on the right-hand side.

Step
Extract the contents to it’s own folder
Extract the contents of the .zip file to a folder of your choice. In order to extract the files, we recommend downloading software which is able to unzip files such as 7Zip, which you can download here.

Step
Run the batch file included in the folder
Locate and run ‘MediaCreationTool.bat’ . Ignore any false flags that Windows might throw your way, it’s safe to use. This will open another subsequent window, and you can proceed further into the process from there.

Step
Select the Windows version you want to install
On this screen, you will see a big blue window, in addition to another panel running in another window asking you to select from various options. Since we want the latest release of Windows 11, you can highlight and click ’11’ on this screen to proceed.

Step
Select installation method
On this next screen, you will be presented with a range of options to choose from. If you are running a Virtual Machine, you will want ISO. For anything else, we recommend that you use ‘Create USB’, with a formatted USB Drive of at least 16GB inserted into your system or computer. This will ensure that you have a boot drive that will also work with any other computer that does not support TPM 2.0 when you want to install Windows 11 from this device in the future.
When a window pops up asking you to run Powershell, respond with ‘Yes’ and continue.

Step
Choose which media to use
Here, you will be able to select from either USB Drive or ISO file that will help you prepare the installation media for Windows 11.

Step
Select the installation media (USB Only)
On this list, you will be able to see a list of compatible drives that you will be able to use in order to create a bootable version of Windows 11. You will be able to use this drive again on any other PC that also requires TPM 2.0 to be bypassed.

Step
Allow the Media Creation Tool to install the files required
The Media Creation Tool will then begin downloading the files necessary for installation. Don’t worry if it mentions Windows 10, that can be safely ignored.
Once finished, you will now have a bootable Windows 11 USB Drive that you can use to bypass TPM 2.0.

Final word
After this process, you can then use the USB Drive or ISO to install Windows 11 on your device, successfully bypassing TPM 2.0. However, this method does not support updates for Windows 11, meaning you will then have to repeat the process to install any future builds. It’s unclear if this method throws up any further bugs on Windows 11, so proceed with caution!


